Showing posts with label Instructions Available. Show all posts

Friday, November 11, 2016

Per Requests - Christmas Sampler Help


I have had several requests for the instructions on how I created my Christmas Sampler a while back. At first I was hesitant to share too much as I plan on having a few more classes with different themes based on this project. Then I decided that sharing this would just mean I need to create a different layout for each new sampler! That would be better any way and a challenge for me. Problem solved.


So here we go. To make yours exactly like mine you will need the following: (you can of course substitute what you wish to)
  • 12 x 12 cardstock for background
  • 3 sheets each of 8 1/2 x 11 cardstock in two different colours
  • coordinating Stampin' Write Markers (colouring stamps)
  • Foil cardstock (your choice of colour)
  • Tin of Cards stamp set (142180)
  • Peace This Christmas stamp set (141570)
  • Wonderful Year stamp set (142158)
  • Seasonal Bells Bundle (143533) stamp set (142107) Bell punch (141846)
  • Layering Square Framelits (141708)
  • Pretty Pine Thinlits (141851)
  • Coordinating Ink Pad colours to your cardstock choices
  • pencil
  • ruler
  • Fast Fuse, Tear & Tape, or glue
  • Dimensionals

Coloured Die Cut Scalloped Squares

  • Die cut 12 scalloped squares @ 2 1/2"
  • Die cut 12 scalloped squares @2 1/4"
Straight Edge Die Cut Squares

  •  Die cut 12 straight edged squares @ 1 7/8'

Center Squares (paper trimmer)

  • 1 @ 4 3/4" square
  • 1 @ 4 1/2" square 
  • 1 @ 4 1/4" square

Decorative Die Cuts (Pretty Pines)

Die cut your choice of embellishing die cuts in foil and coloured cardstock

Bell

Stamp your bell onto a coloured cardstock and punch it out with the Bell Punch

STAMPING

Decide before you begin if you wish to ink the edges of your squares. You can do this before stamping or after stamping

Use your Stampin' Write markers for the stamps with multiple colours and the coordinating Ink Pads for regular stamping of other stamps.

ASSEMBLY

  • Use your pencil & ruler to light draw a line 3/4" from the edge of your 12" x 12" cardstock background.
  • With the larger scalloped squares position them around the edge, nearly touching the pencil line, and eyeballing the spacing (or measure if you wish)
  • When satisfied, attach them onto the background
  • Now center the largest of the center mats
  • go around and attach the next layer of squares with dimensionals (or adhesive if you wish it to be flatter)
  • attach all your stamped squares with dimensionals
  • attach all your embellishments
Here are the photos again, of the three sample I made


Have fun making your version of my Christmas Sampler!

Happy Stamping!


http://www.stampinup.net/esuite/home/sabradcreations/promotions

From November 1st through 30th, you have the opportunity to purchase Stitched Shapes Framelits ahead of their official release in the 2017-2018 annual catalog and get 25% off coordinating stamp sets. With Stitched Shapes Framelits you can make paper stitches in seconds, turning any project into one that is stitched from the heart.




Thursday, October 13, 2016

Travel/Trip Planner - By the Shore DSP


Hello everyone!

I recently had a class at Scrapbook Essentials BC, where we created a Christmas planner. I always mention different uses for a planner besides for Christmas. And when I mentioned a Travel or Trip planner, I knew I had to make one using the "By The Shore" DSP and share with my Stampin' Up Customers and friends. Because this planner is for planning a trip, I had to use a retired stamp set. My apologies if you want to order it.

There are a lot of photos showing this planner, so I will not have something to write with each photo, just to keep the post from getting too long.


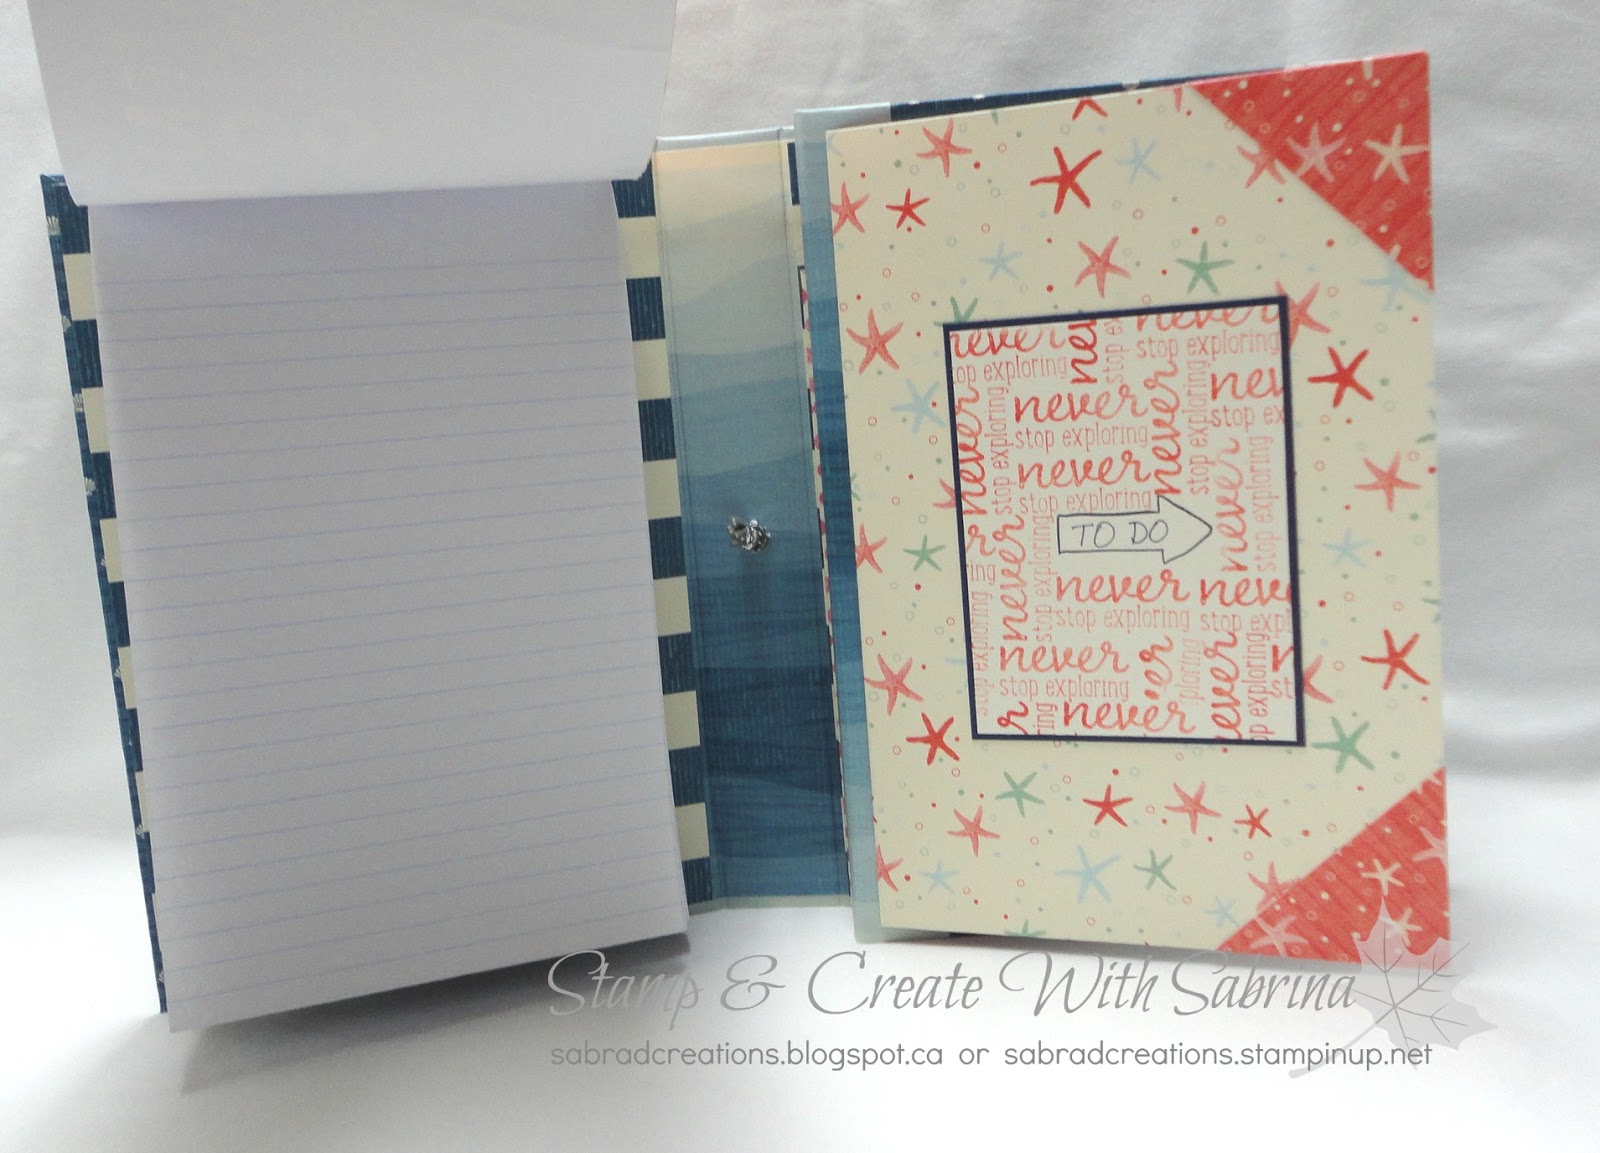
When first opened, you find a note pad on the left, and a page flap on the right.


The page flap opened. This is where I would place a trip planning check list.


Flip the next section to the right to reveal pockets containing tags and folders.


Close up for the 3 x 4 card I created with the retired Project Life "Let's Get Away" stamp set.


Another 3 x 4 card where I stamped in the center, and using a Stampin' Write Marker, hand wrote my background text.


You see the folder taken out of their pockets, here. I would attach in side one a planned itinerary, and in another a list of places you want to visit.


On the tags pulled below, I would attach on one side a calendar that you can write on (day, week, or month depending how long your trip is), and on the other side a "To Do" List for planning what is on the calendar side.


When you fold open the last panel of the planner, it will look like this, revealing a receipt & ticket stub envelope.


Close up of the stamped 3 x 4 card.


Close up of the 'receipt & ticket stub' envelope.

Close up of the 3 x 4 card.


Envelope flap opened.


The planner all closed up again.


You know that I created this for a Christmas planner, and adapted it here as a Travel or Trip planner, but you can also adapt it as a Wedding planner, a Family Reunion planner, and so on. You could also use this as a photo folio rather than a planner!

If you are wondering about the planner pages to print and attach on the pages, folders & tags, just search fro free printable planners for Christmas, Wedding, Travel, Trip, Family Reunion, etc. Or, you can create your own! You will need pages for the smaller planner, not the full sized 8 1/2 x 11.

If you are interested in making your own version of this, I do have the instructions for sale. Because the file is rather large, I can not send it as an attachment in an email and can only send you a link to the PDF instructions to download and save, through Adobe PDF Services. So that is what you get when you order the instructions to this project, just a link.


Instruction Options
If you have any questions, I'd be happy to answer them. Just email me.


Thank you for stopping by today, and hope you are inspired to create some lovely Christmas gifts like this project.


Happy creating!


October 1 through 31 , you can buy three packages of Designer Series Paper and get one free! That’s great news since everyone can use more Designer Series Paper. This sale includes Designer Series Paper from both the annual catalog and the recently released holiday catalog (not including Specialty Designer Series Paper or Designer Series Paper Stacks).

Take advantage of these specials for all those Christmas projects you are planning to work on, or gift some lovely supplies to family or friends that love to craft and create!


Sunday, May 29, 2016

VanIsle Stampin' UP Meeting Make & Take - Double Business Card Holder


Hello everyone!

Hope your weekend is a good one whether your are busy, relaxing, or having fun.

Yesterday I attended our VanIsle Stampin' Up! meeting in Nanaimo. Since I became a SU Demonstrator  a year and a half ago, I have never volunteered to create a Make & Take for this meeting, so I thought it was about time I did.

As a Demonstrator I like to keep business cards on me at all times, but it's hard to fine a business card holder that holds a lot of cards or doesn't cost too much. So I decided to see if I could create one myself. I figured that if I created a deep pocket for my cards they would inevitably end up loose and shaking about. So to solve that problem, I thought that two narrower pockets for cards would work better. And, if a Demonstrator has business cards for work as well as for Stampin' Up! then there are two pockets that can hold each.

Here is a collage of the holder that I made for myself.


So for the meeting yesterday I made 35 kits in seven different colours and showed everyone how to assemble their business card holder.

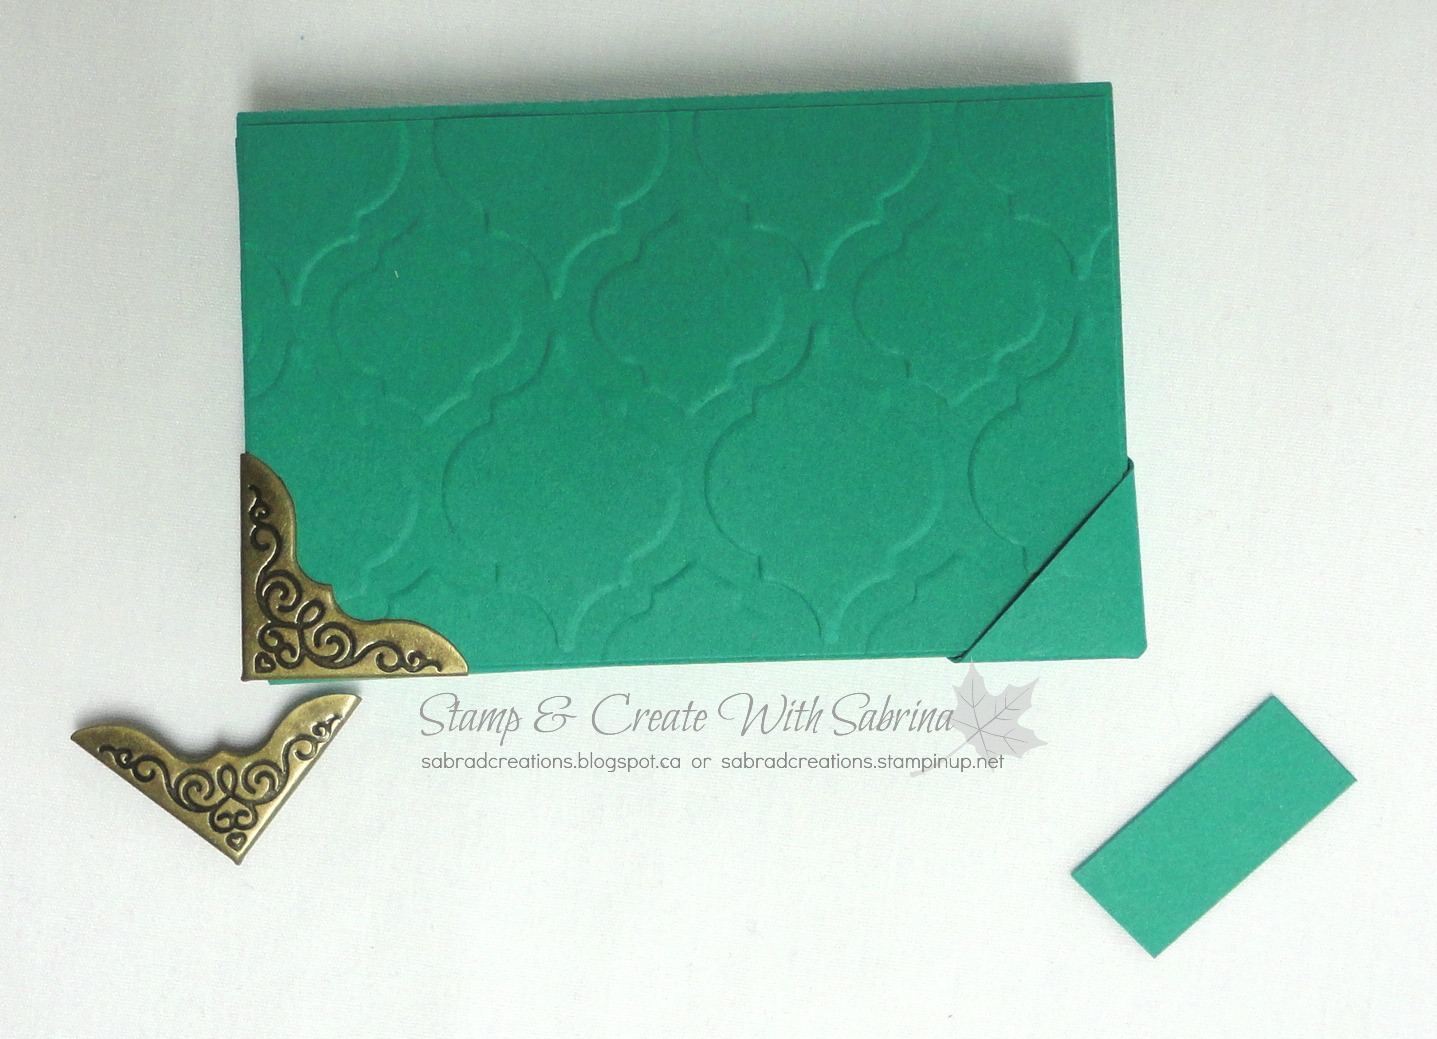
Everyone wanted to know where to get the brass metal corner protectors. I get them from ButterBee Scraps . Here is the direct link to the corners, and the direct link to the small disc magnets I use.

If you do not wish to use metal corner protectors you can strengthen your corners using cardstock as you see in this next photo showing the corner done both ways. How to do this is also included in the instructions.


I also promised to have the instructions with measurements on today's blog post. They are listed under my instructions tab at the top of my blog, but if you click here you can access the link and print out your FREE PDF instructions as well.

I should have taken some photos of everyone working on their business card holder to share with you today, but I didn't think of it at the time.

Hope that you will enjoy working on this little project!


Your Instructions in PDF File format


SALE STAMP SETS NOT IN THE CURRENT CATALOGUE!


Hello everyone!

Did you know that there are stamp sets on sale that are not in the catalogue? Are you interested in seeing them? Below is a snap of the items...


...and here is the link to the PDF file if you need to see it a little larger.

Just email me and let me know the name and codes to the stamp sets you are interested in ordering before the end of May!


Extra Stampin’ Rewards!
For the month of June, you can get $40 in Extra Stampin' Rewards when you host a stamping event with $400 or more in sales. That’s more money you can use for products in the new annual catalog, and you know there are PLENTY of new products you’ll want to bring home. Remember, Stampin’ Rewards can be used on a Starter Kit, so this is a great time for you to sign up with me!


 Details
  • Hosts who have qualifying events with $400 CAD or more in sales during the promotion period (June 1 - 30) will receive $40 CAD in Extra Stampin’ Rewards for the order.
  • Hosts may participate in this promotion multiple times by hosting multiple events, but each event must qualify on its own.
  • Customer, workshop, and online orders qualify for this promotion.
  • Qualifying orders must qualify with merchandise prior to shipping and tax.


Sunday, May 15, 2016

Sneak Peek at a Pocket Accordion Folio


Today is the day I will return back home. It will take me a day to unpack and unwind from the trip. But I will be able to answer emails, and take orders again sometime on Monday. In the meantime I am giving you a sneak peak of a small pocket-like accordion folio that will fit in your purse or be easily passed around in a group to view. I hope to have a class, or sell the instructions on how to make it. It will depend on you, my customers, to let me know which you would prefer. SO be sure to comment below, email me, or message me your preference.

Remember this is only a sneak peek so you won't be getting the inside details just yet. Plus the DSP used for this project in a class setting, will be different, using DSP from the new June Catalogue.


The magnetic flap closure is at the top and the pages inside go which way, you think?


If you like folios and mini albums, let me know your option preference - class or instructions - and watch for it this Summer!

Happy creating!


Friday, April 8, 2016

Box Day - Business 10 Size

I was planning on posting this yesterday, but wasn't able to do so, and there was no post for you. Sorry.

Many of you know that I like to create cards that fit into the size 10 business envelopes as a different size and shape for a card. My samples on the size of card was building up, so I thought why not make a box that will hold a few of them! I have six cards in my box, but then some of them have one or more popped up layers to them. If you don't do that then the box will hold a few more than six cards.


It has a magnetic closure (three magnets).


I had fun stamping the top piece using the "Number of Years" stamp set in neutral colours.


If you are wondering about the corner protectors, I purchased them from ButterBee Scraps.


On the inside of the lid I used the "Number of Years" in the corners, "Layered Letters" and "Tin of Cards" stamp sets.

To access the cards in the box, just flip open the flaps!


This box uses three sheets of 8 1/2" x 11" cardstock, and 1 or 2 sheets of 12 x 12 DSP, depending on the pattern.

These instructions are for sale, and can be purchased by clicking on the "Instructions" at the top of the blog.

Here is the box created for the instructions, without any stamping and embellishing.

Thank you for stopping by today! Hope you all will find a little time for yourself to papercraft this weekend! I know the weather is beautiful out there now, but maybe you can set up a little station out side to still craft.

Happy crafting!


Friday, March 4, 2016

Tall A2 Card Box Instructions - Free


Many have asked how to make the tall (or portrait) card box that can hold 6 4 1/4 x 5 1/2 cards and their envelopes from this post.


I was thinking originally to hold of and sell the instructions, but decided in the end to share it with you all.

You will require 1 sheet of cardstock at 8 1/2" x 11" and one piece at 4 11/16" x 5" to make the base of this box.


After scoring this piece, you may want to shave off 1/16th of an inch on the 1" tab so that it will fit better when attaching it to the box.

Next, cut your cardstock to look like this next photo, and round the corners as seen.


I like to cut on either side of the score line as you see on the little tabs.


DSP Pieces

I will give you the measurements for all sides of the box. You can, of course, choose to cover only some of the box base parts if you wish.

2 @ 4 11/16" x 7/8" - top and bottom
2 @ 7/8" x 5 7/8" - sides
1 @ 4 5/8" x 5 7/8" - back
1 @ 4 11/16" x 2 3/4" - bottom front
1 @ 4 11/16" x 3 7/8" - box flap

So there you have it! Hope that this is straight forward enough. If you have any questions, just email me.

Happy creating everyone!