Showing posts with label Tip. Show all posts

Sunday, April 3, 2016

Organization Tip 2 - Pre Cutting

In February, I shared an idea with you on what you can do to organized your craft room with using some of your Whisper White and Very Vanilla cardstock scraps (see here). Today, I would like share with with you what I've started to do every time I order Whisper White and Very Vanilla cardsock.

I take half of each package and pre-cut cardstock to sizes I use on a regular basis for the out side as well as the inside of cards. I store them in front of me, next to my ink pads and markers, where they are within easy reach. I store them in the Full Wide Stamp Cases (127551), and have labeled the sizes held within each case.

 These are the sizes I mainly use -  4"w x 5 1/4"h, 3 7/8"w x 5 1/4"h, & 3 3/4"w x 5".

The next thing I do, because of the strips that are left after cutting, is create smaller strips for stamping sentiments, and store them in little ziploc bags, also with easy reach. These can be stamped, and then cut down to a smaller size, or punched a the end to create a banner.

To further organize, I have several ideas that I will be sharing with your, the first Sunday of every month, from now on.

I love using the Stamp Cases for all sorts of organization in craft room. Some of these will be shared with you at a later date. But if you would like to start doing the same, start with six of them, if only for the three different sizes for each white and cream.

Thank you for stopping by, and have fun organizing your craft room a little bit at a time, with me!


Wednesday, February 10, 2016

Double Page Layout Using Neutrals DSP Stack & Wallet Size Photos


Hi Everyone!

It's been a while since I've done a more traditional scrapbooking layout. I have a lot of duplicate photos left from other projects to use up, so I came up with the idea of creating a double page layout for each of my Grandchildren  in some the moments captured from their last visit.


I want to talk a little about choosing colours for your layout. Often people try to pick colours that are in the photos. There isn't anything wrong about that, and usually works just fine, but I want talk about complimenting colours in the photos. Choosing colours that are across the colour wheel from the dominate colour in the photo can do a lot to make you photos actually stand out more.

For this layout I chose brown to compliment and make the blue in the photos I chose, stand out more. If I had chosen blue colours, it would have looked great, but the brown makes the blue pop. What other colours do you know that would do the same thing?

The next two photos show each page on it's own so that you can see a few more details. If you want to see an even larger photo, click on it.  

I used some retired product in this layout, and the word strips are cut from non-SU DSP. The DSP had a design with sentiments in different sizes printed all over it, in different angles. I just had to cut them all out! I have more for of these for future layouts. I also used bits and pieces left over from Paper Pumpkin and other kits.Lets get away

Here's the second page.


Buy using mainly wallet sized, or photos cut down to wallet size, I was able to place then on strips that were 2 3/4" wide and the tops centered and punched with the 'Ornate Topper Punch'. I then snipped the top end pieces, that come from punching something wider than the punch, off. 

Anything that I used, and is not retired, you will find on the list below.

Thank you for coming by for a look today. Hope your day is a good one!

Happy Scrapbooking!


Built for Free Using: My Stampin Blog


Sale-A-Bration! Remember that for every $60 you spend on products from the brand-new Occasions catalogue or Annual Catalogue, you can choose a FREE exclusive Sale-A-Bration product!


PAPER PUMPKIN SALE!

What could possibly make Sale-A-Bration even better? Getting Paper Pumpkin involved of course! Stampin' Up!'s three month PAPER PUMPKIN SALE! January 5th through March 31. A great deal with a surprise kit at your door every month!

3-Month Prepaid Subscription (137859) $$74.85 $69
Save on a 3-month prepaid subscription and instantly qualify for a FREE Sale-A-Bration item!
12-Month Prepaid Subscription (137861) $275.40
Take it to the next level with a 12-month prepaid subscription. Save $24 a year with the everyday awesome price, earn Stampin' Rewards, and instantly qualify for 4 FREE Sale-A-Bration items!

There have been some pretty fantastic Paper Pumpkin kits over this year. Don't miss out on the fun and your chance to save on a 3-month Paper Pumpkin subscription and get a FREE Sale-A-Bration item until March 31st. Contact me today! (sabradcreations@gmail.com)


Monday, February 1, 2016

More You Can Do With Scraps - Sentiments

 Hello Everyone!

Yesterday I shared with you what you can create to use up some of those scraps that begin to pile up. Today, I'd like to share with you what you can do to use up small cardstock scraps and organize your cardmaking; especially for those times when you have to put something together real quick!

In the following photo you see a little organizing container that I purchase a few of from a Dollar store a couple of years ago. (The bottom measurements are 3 1/4" wide x 5" long, and it is larger at the top) I'm wishing now that I had bought more of these since they don't have them any longer! The container is labeled with a name of a stamp set. In this case the 'And Many More' stamp set. And in the container are several little ziploc bags, also from the Dollar store, containing either Whisper White or Very Vanilla cardstock and a facsimile at the top of what each bag holds.


As I mentioned yesterday, I'm getting better at not hoarding every little piece of scrap for future. But what I do do, is keep some of them and at the end of each month I will watch a movie, or maybe two if I want to create more, and pick one or two stamp sets (or ones that I need to refill my bags with again) and stamp away on my many little pieces. I then take the more commonly used punches for sentiments (not all are in this photo) and punch them all out and place into the bags to be stored in these little organization bins.


Since this is the only one that currently has bags with sentiments in them, this is the only one I'm showing you. But I will show them all to you when they are filled again.

Below is a little closer look at some of them.


When I'm done refilling or creating a new set, I then throw away the rest (all of) the scraps no matter what my mind says about being able to use them, because experience has taught me that there will always be more to come. And after all I only have so much space, and I want to keep scraps from invading my space with the hope of using every little bit. Plus I know I will always what that next new DSP or lovely coloured cardstock! Lol!

This really helps me, and it gets easier to throw away scraps that don't get used, every time. I would like to challenge you to find a way to make use of your scraps, and not hoard them too long. What works for you?

Thanks for stopping by and happy stamping!


Sale-A-Bration! Remember that for every $60 you spend on products from the brand-new occasions catalogue (or any other current Stampin’ Up! publication), you’ll get a FREE exclusive Sale-A-Bration product.


PAPER PUMPKIN SALE!

What could possibly make Sale-A-Bration even better? Getting Paper Pumpkin involved of course! Stampin' Up!'s three month PAPER PUMPKIN SALE! January 5th through March 31. A great deal with a surprise kit at your door every month!

3-Month Prepaid Subscription (137859) $$74.85 $69
Save on a 3-month prepaid subscription and instantly qualify for a FREE Sale-A-Bration item!
12-Month Prepaid Subscription (137861) $275.40
Take it to the next level with a 12-month prepaid subscription. Save $24 a year with the everyday awesome price, earn Stampin' Rewards, and instantly qualify for 4 FREE Sale-A-Bration items!

There have been some pretty fantastic Paper Pumpkin kits over this year. Don't miss out on the fun and your chance to save on a 3-month Paper Pumpkin subscription and get a FREE Sale-A-Bration item until March 31st. Contact me today! (sabradcreations@gmail.com)


Thursday, April 23, 2015

Stampin' Up Stamp Cases For Storage & Organization

I love exploring craft room storage, especially those that use, or work for, Stampin' Up products. I came across a few things that are a stroke of genius, and wanted to share them with you. I am looking at organizational and storage ideas using the Stampin' Up Stamp Cases!

Shannon Jaramillo made her own Sponge Daubber storage system using dome cardstock and a wood block stamp case!


Great idea, right? Make your own Sponge Dauber storage by following Shannon's instructions here.

Next, I also learned at the last Nanaimo SU meeting that you can store your ink pad refillers in the wood block stamp cases. Both the half and full size will work. I found a couple of photos to show you.


I then learned that some people like to store their Stampin' Write Markers in the clear & polymer stamp cases (the thinner ones). I like to store mine right next to my ink pads.


Another thing that has been popular for the thinner stamp cases is to store your Thinlits & Framelits in them.


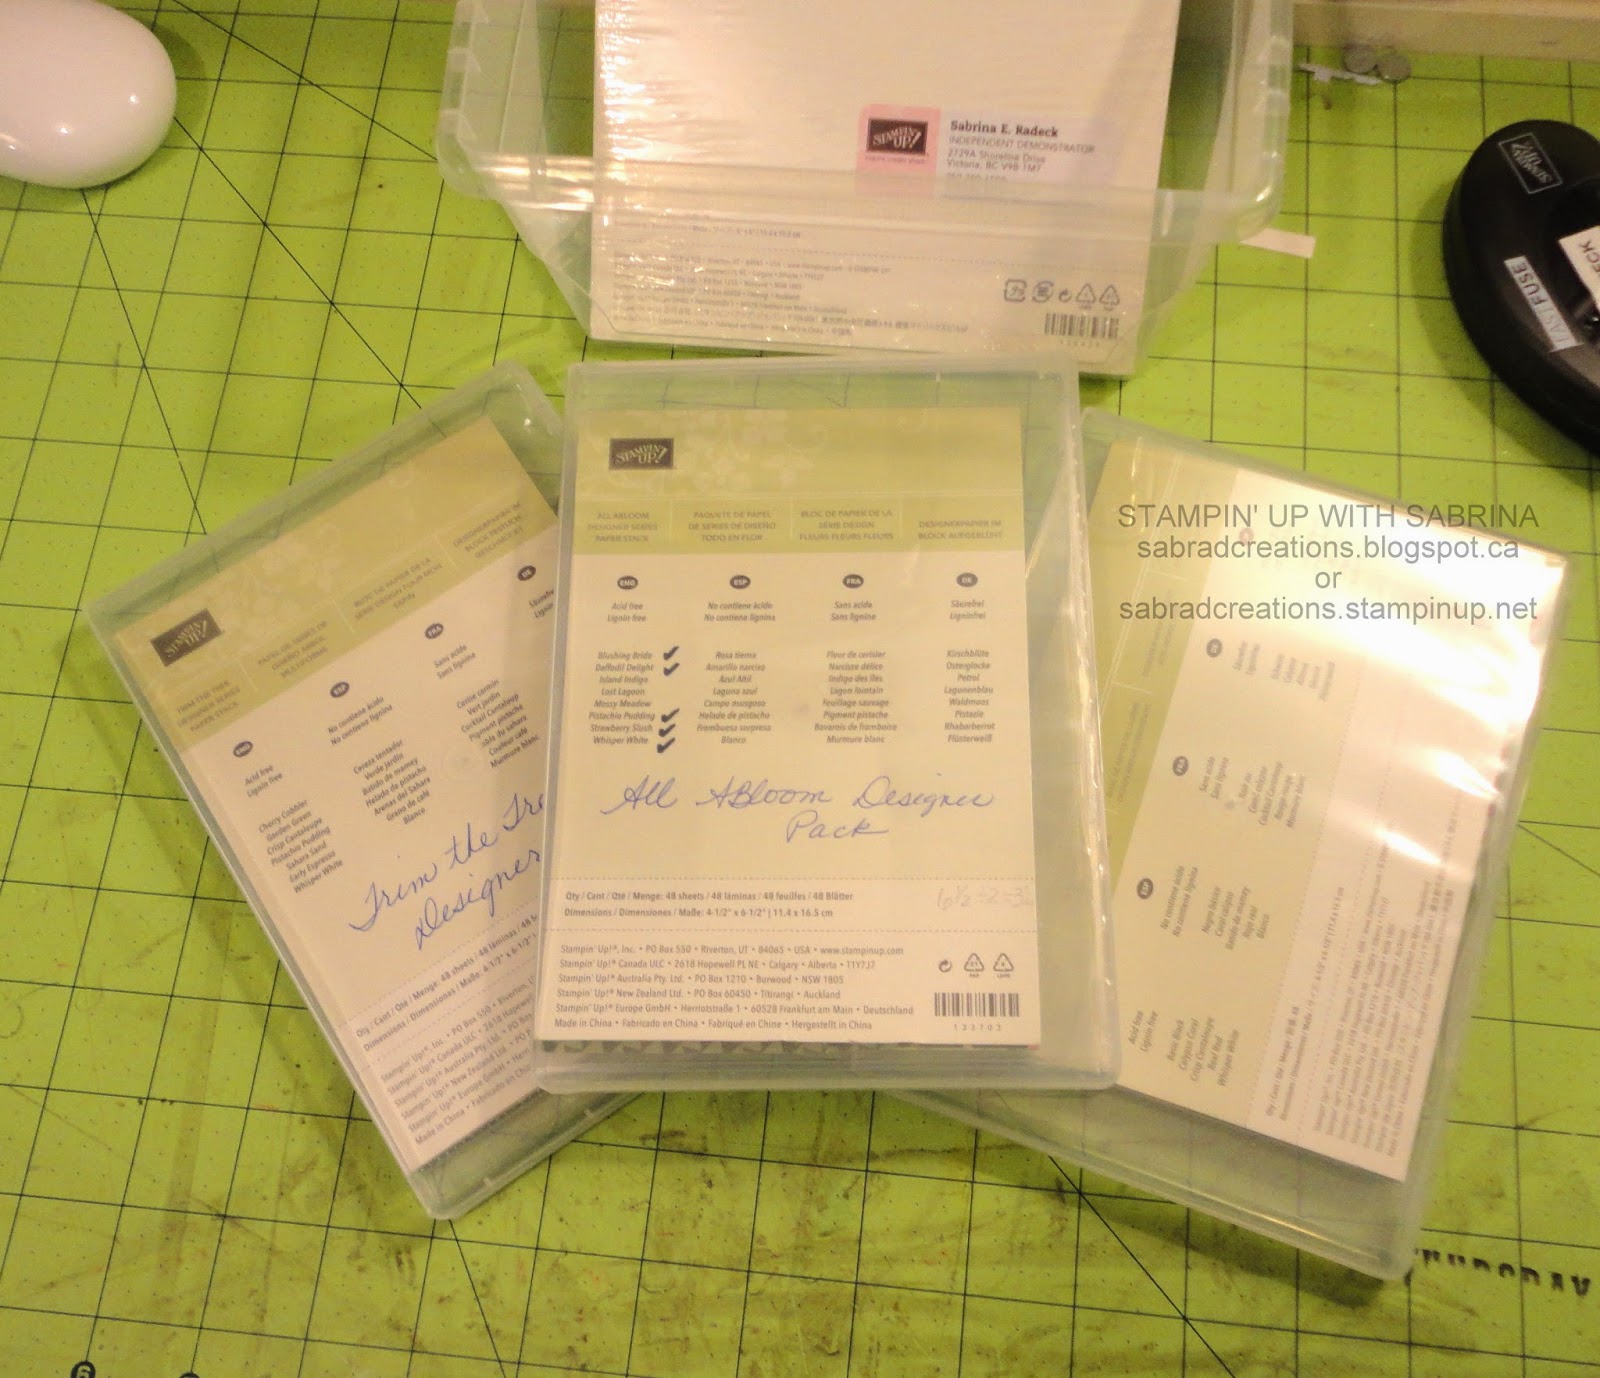
This is one idea that I really love. I came up with idea myself before I learned that many others are doing this as well. I love those little Designer Series Paper Stacks, but find it hard to keep the pieces I don't use with the paper stack. I realized that they fit ever so nicely in the thinner stamp cases! No more bits and pieces falling out! Here re mine minus the covers I haven't gotten around to making.


This works great for me! Just need to desingn those covers!

One last thing I would share is there are many more things that these cases can be used for. The sky's the limit in imagining all sorts of organizational and storage ideas for these cases! I've even thought of storing rhinestone sheets, pearl sheets, dimensionals, and bakers twine cards in them!

If you have any other ideas that these cases can be used for, please share them in a comment below.

Thank you for stopping by today.

Happy stamping!


Built for Free Using: My Stampin Blog

If your order is $200+, then I want you to use all the Hostess Rewards you’ve earned.  If your order is under that, I’d be more than happy if you add  RASSC6C3 as the Hostess Code when you order.  When shopping online, enter your items into your cart (total must be under $200). At check out, look under "Special Offers" (bottom left) enter the Hostess Code in the box and click on apply.


Thursday, December 11, 2014

Stampin' Up Colour Coach - Great Tool!

On page 176 of the Annual 2014/2015 Catalogue, you will find a little item called "Colour Coach". This is a very handy dandy thing to have if you want to be organized and save some time hunting colours and combinations. There is the basic colour (#130118) sets as well as additional "In Colour" cards (#133718 & #130120) to purchase and add to them.
This is great to have to quickly match colour combinations, or look for that just right shade. Should you choose from Regals, Subtles, Brights? This is much easier to pull out than go through your scraps or papers.

You could also make your own using one of the "Tag Topper" Punches! (page 221)


Pssst, there's a new one coming out soon....shhhh.

Here is a little video showing you the one that I have made so far.


So I think I will be making more with stamping and embossing etc, as guides to make quick decisions in the future.

Share what you do to be an organized card maker or scrapbooker, to make your creative process easier, in a comment below.

Thank you for watching and sharing! Happy stamping!


Built for Free Using: My Stampin Blog


How to use the Hostess code (upper right corner of blog):
  1. when shopping online, enter your items into your cart (total must be under $200)
  2. at check out, look under "Special Offers" (bottom left)
  3. enter the Hostes Code in the box and click on apply
NOTE: If your order is $200 or more, do not use this code