Showing posts with label Tutorial. Show all posts

Sunday, December 14, 2014

Mini Gift Bag Box

Today I am casing a little project created by Sam at pootles.co.uk. I've change the dimensions just a little. She creates some really cute little boxes and projects.

Sometimes we have these little gifts to give but have a hard time finding something to wrap them in. This is one solution.


This little Mini Gift Bag Boxes can hold lipsticks, chapsticks, bath balms, mini candles, 2 nail polishes, a variety of treats, and more. They are quick and easy to make. if you need to make a bunch of them and save time you can add the DSP to just the front of the box. I didn't make a little tag for this project, that will be up to you to make on your own.

So, here is the tutorial video on how to make these cute little minis.


 Cute, easy, solves the packaging problem you might have. I could also see a nice big basket full of these for Christmas.

Measurements:

Cardstock - 8 1/2" x 5 1/2"
  • with 8 1/2" across the top, score @ 2 5/8", 4", 6 5/8" & 8"
  • turn with 5 1/2" across the top, score @ 1 3/8" & 4" (the left is the bottom of the box)
Designer Series Paper

  • 2 @ 2 1/2" x 2 1/2"
  • 2 @ 1 1/4" x 2 1/2"
  • (or if mass producing just cut for the front - 1 @ 2 1/2" x 2 1/2")
Listen carefully to the instructions for the creation of this project as per tutorial


So below are all the products used to make these adorable Mini Gift Bag Boxes.

Built for Free Using: My Stampin Blog

Hope you enjoyed today's little tutorial. I have another one in the works for you, and will post it in a day or two. Thank you for stopping by.


How to use the Hostess code (upper right corner of blog):
  1. when shopping online, enter your items into your cart (total must be under $200)
  2. at check out, look under "Special Offers" (bottom left) enter the Hostess Code in the box and click on apply 
NOTE: If your order is $200 or more, do not use this code

Monday, December 1, 2014

Using the Scallop Top Tag Punch On A Card

Hi Everyone!

If my back doesn't get better soon, this may be the last project posted for a little while. I made these recent projects you've been seeing the last few days a while ago and have been able to work on posting them here and there.

I had fun trying to come with something a little different for a card. So, here goes.


You can see here, that I stamped directly onto the Dazzling Diamond Glimmer paper. I then added a snowflake stamped on vellum, and cut out. I positioned exactly over a snowflake stamped onto the Glimmer paper. I just love that Soft Sky 1/2" Seam Binding Ribbon!


Can you see that these card tabs are not attached to the card, but rather are part of the card base?


How did I do that? Watch the tutorial video to find out how, and  few other ideas to use this kind of card for.


Here are a couple more photos of the card I made.


Measurements

Cardstock Base - 8 1/2" x 5 1/2" - Score as per video instructions
Front Panel - 2 9/16" x 5 3/8"
Inside Panels - 1 @  2 9/16" x 5 3/8", & 1 @ 2 1/2" x 5 3/8"
Ribbon - 16"

 Have some fun making your own version of this card! See the products used for this card, below.


Built for Free Using: My Stampin Blog

Saturday, November 29, 2014

The Newborn King

Today I woke up to find a very thin layer of snow here in Victoria, BC. This used to be a rare occurrence, but it seems nearly every year of late, this happens once or twice a year. But it did remind me that Christmas is not far off.

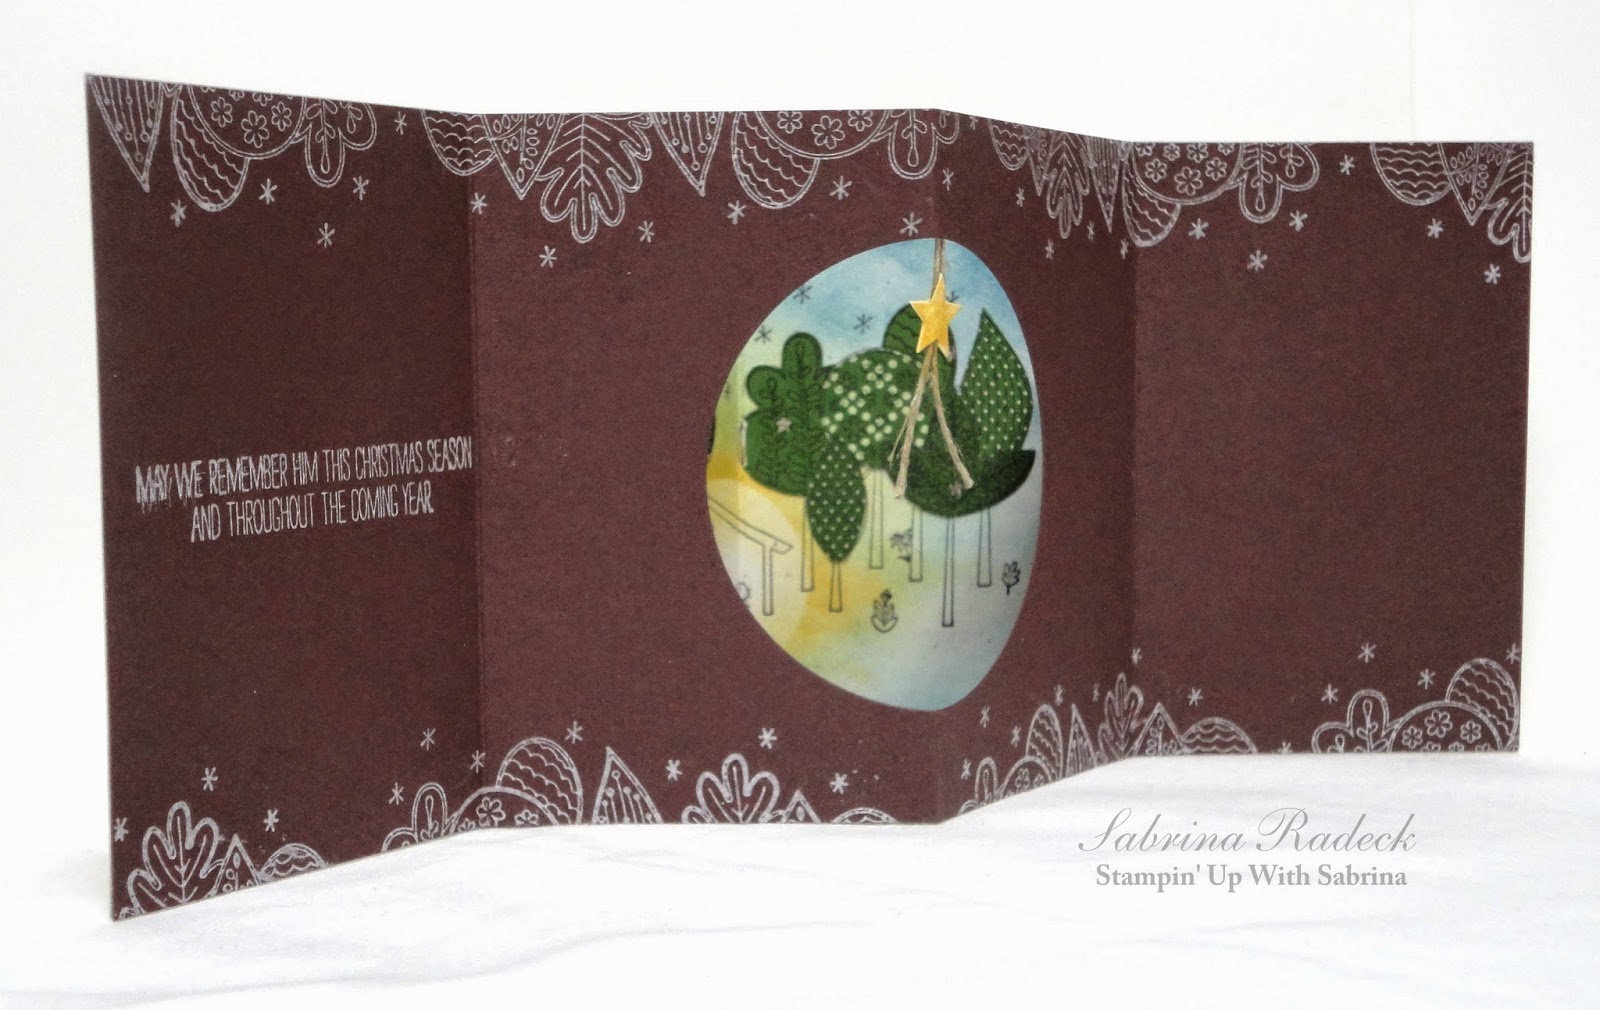
I'm sharing with you today a card I made using "The Newborn King" stamp set. I don't have any Blendabilities yet, so how could I use this stamp? This is what I came up with.


You will note that by tracing "Glory" with Dazzling Details made the Mossy Meadows ink run. It had never done that before, so I was disappointed when it happened. You can see that on the So Saffron star it is fine.

This is what you see when you open the card.


First, I used a 1 3/8" punched circle scrap to lay over the nativity and with a sponge blended So Saffron ink around the outside of the circle. Once I was happy with the colour, I removed the circle and lightly blended the inside of the circle leaving the center untouched. Then came a light blending of Pool Party, and then Marina Mist.

Next, I took three different designs of green paper from Trim The Tree Designer pack, stamping the image on each. I cut out some of the treetops from each and paper pieced the stamped image.The star hanging, is the star from the stamp set "Festival of Trees" (stamped twice for front and back).


If you are going to paper piece, be sure that your image doesn't have a paper piecing section on the fold of the card like the section of tree you see on the fold.


Blues and silvers/grays, or blues and gold would look good too!

Measurements

Card
Naturals White - 4 1/4" x 11" - score @ 5 1/2"
Chocolate Chip - 4 1/4" x 11" - score @ 5 1/2" then turn cardstock to other side & score at 3" & 8"

First die cut your circle from the center before folding any scorelines. Using the Whisper White ink and the treetop part of the stamp, create a top and bottom border on the Chocolate Chip card interior piece. Then stamp your sentiment on the left panel.

Card front layers
Chocolate Chip - 5" x 3 3/4"
Cherry Cobbler - 4 7/8" x 3 5/8"
Naturals White - 4 3/8" x 3 1/8"

I found the Mossy Meadows ink looked too black, so I decided to second stamp with this colour and it looks more green. Create the border on the Naturals white piece with Mossy Meadows ink in the same manner as with the border on the Chocolate Chip piece but going around all four sides. Then stamp the sentiment, then the star with So Saffron.

The products used for this card can be found below.

Hope you are inspired to create cards like this one using whatever stamps you wish. And don't forget my Stampin' Up Give-a-way!

Have fun!


Built for Free Using: My Stampin Blog

Wednesday, November 19, 2014

Quick & Easy Wallet Folio

Happy Wednesday!

Looking for a quick & easy project for multiple gifts? How about a Wallet Folio!


I used the "All Is Calm" DSP for this project, but you can change it up with any of the other beautiful DSP to change the theme of this Wallet Folio.

Materials you will need-
  • 3 sheets of 8 1/2" x 11" cardstock
  • 2 sheets of 12" x 12" DSP
  • 9 feet of Whisper White Bakers Twine
  • 4 coordinating smaller buttons
  • 4 brads (2 larger & 2 smaller)
Tools you will need-
  • Stampin' Trimmer
  •  Simply Scored Scoring Tool
  • 1" Circle Punch
  • 3/4" Circle Punch
  • 1/8" Handheld Punch
  • Paper Piercing Tool
  • Multi-Purpose Liquid Glue
  • your choice of Stampin' Up double sided adhesive
  • Envelope Punch Board
  • optional - Project Life Corner Punch (the envelope punch bord has a built-in corner rounder)
Cutting your pieces-

Cardstock
  • 1 @ 11" x 8 1/2" (wallet)
  • 1 @ 8" x 3 1/2" (photo page)
  • 1 @ 7" x 3 1/2"  (photo page)
  • 1 @ 6" x 3 1/2"  (photo page)
  • 1 @ 5" x 3 1/2"  (photo page)
  • 4 @ 2 1/2" x 3 1/2"  (tags)
DSP

Outside
  • 1 @ 2 1/8" x 8 3/8"
  • 2 @ 4" x 8 3/8"  
Inside
  • 1 @ 2 1/8" x 8 3/8"
  • 1 @ 4" x 8 5/16"
  • 1 @ 2 1/4" x 9 5/16"
Follow this video tutorial to make your own Wallet Folio!


Thank you for watching!

When ordering from my website, please do use the hostess code to support Stampin' Up With Sabrina (hostess code is shown in the top right corner of my blog is the most current one). If your order is more than $150, please do not use this code! This code expires midnight (PDST). Thank you.


Click on any of the items, below, that you need to make this project.

Friday, November 7, 2014

More Favor Boxes... Lindt Lindor Chocolates


One of my favorite chocolates are the Lindt Lindor Chocolate balls. I love how they melt in your mouth. They make a wonderful treat for party favours and such. Since I still didn't have my Christmas paper at the time I wanted to make this, I decided to make it as a Birthday Party Favour! Right after making this, my paper arrived! Wouldn't you know it. So look soon for a new creation using the 'All Is Calm' Specialty Designer Series Paper.

Completed this little box measures 4 1/4 x 1 1/4 x 1 1/4 and hold three of those lovely chocolates! You can of course make this for any kind of occasion!

Here is how you make it! You'll have to forgive my using some non Stampin' Up tools, but they will be on their way soon!!


Begin with a piece of cardstock or designer series paper at 6 3/4 x 5 3/4, and follow the instructions in the video!

Missing something to make your Christmas projects complete and unique?  Check out the Holiday Catalogue again, and get what you need to make it just right!

Hope you are having fun making all these little projects. One of them might be just what you re looking to make!

Happy Stamping & Creating!


Reminder, that Monday the 10th is the last day for the current Weekly Deals!


Thursday, November 6, 2014

Chirstmas Favor & Name Place Setting Card - Ghirardelli Chocolate Squares

It's hard to  believe that there are only 48 days until Christmas. With Holiday parties and Family Get-Togethers, we some times look for something different to create for those occasions. This project serves a duel purpose for such celebrations; a name place card and a treat favor.

I designed this to fit the 2" square Ghirardelli chocolates which in their wrapping measure 3"w x 2"h. The inspiration for this came from Sam at Pootles Papercrafting. I changed the size and design a little to accommodate these chocolates.

This design is a variation of the Tea Bag package and is very easy to create. Just trim the paper to the size, score, fold, tape, insert treat, and tie with ribbon. In the next photo you get a bit of a glimpse of the side view.


Oh, and for those that celebrate St. Nicholas Day (Dec. 6th) This is a great little package to create for some of those treats. Here is a quick tutorial on how to make this adorable little packet.


Paper -   8" x 3 3/4" (This size is designed to fit the packaged Ghirardelli Chocolate Squares)
Score with 8" across the top @ 2 1/4", 2 3/4", 3 1/4", 3 1/2", 4", 4 1/2", & 6 3/4"
Fold as shown in the video
Ribbon - approx 10" - 11"
Twine or Linen Thread
Bell (from craft store or $1 Store)
Your choice of stamps and ink colour (mine shown below)

Be sure to check out the wonderful things available at the "Weekly Deals" and on the "Clearance Rack"!

Thank you for stopping by to check out today's fun little project.
Happy stamping and papercrafting!