Showing posts with label Hello Lovely. Show all posts

Saturday, February 25, 2017

Seashore Stampers Blog Hop - Daily Encouragement/Reminder


Welcome form Mi Ran's blog! Hope you are enjoying the creative ideas we are sharing with you today.


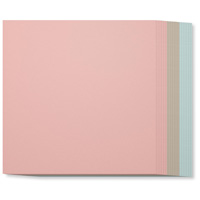
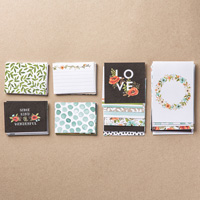
Our theme for today's post is to create something that can be framed. I wasn't originally going to make a sampler, but as I was going through my stash, I came across the gorgeous Project Life "Hello Lovely" set of cards and accessories. Then as I was going through the cards my mind said, 'OK, there are too many items I want to use on this project. Might as well make another sampler.' I hope that you all don't mind. I chose the lighter colours to go with my home, and set out to make something to encourage me and remind me of things to work on.


You can see that everything is popped up with dimensionals. I used an old wall plaque purchased at a thrift store, and the 12 x 12 just fit on top of the image (well, actually it hangs over the edge about 1/32" all the way around).


The accessory package for this set, has some black alpha stickers and gold foil stickers. Obviously I used the gold, to put on the sampler some of the things that I need reminding of, and encouragement for. Being a religious person, praying in the morning when I get up, and at night before going to bed, is something that helps me in many ways. Unfortunately, as a very busy person it is something that I often forget, or put off. Since this makes my life better when I do it on a regular basis, it is important to me. I thought I would use this sampler as a reminder. Study, refers to reading and studying the scriptures on a daily basis, and Act, refers to acting on the things I learn and know are right. (you can see that I ran out of 'T's and had to great one with two 'I's.


Sometimes when we go through challenges, we need to be reminded that life really is beautiful. I fussy cut a few flowers from another card and popped them up in the lower left of the card.


And I added more fussy cutting here, with the banner as a reminder to think Happy Thoughts.


"Keep the faith" is something that we all need to be reminded of, and this doesn't have to be religious faith, but faith in ourselves, in what we are doing, etc., and not give up hope.


I love to fussy cut, so it wasn't an overwhelming thing to cut out this wreath out of one of the cards. This is the center of the sampler, and refers to all the reminders on the sampler...do do them everyday.


These are just some decorative elements for the sampler, and I love how they look.


As I was taking the photos for the post, I realized that these colours not only go in my home, but in parts of my eldest daughter's home as well. So now, do I keep it for myself, or give it as a gift to here, because I know she too wants to work on these things as well. Maybe I can find another plaque or frame and create a second one!

The next photo shows the plaque hanging on my wall.


If you missed the previous hop post, click on the 'previous' button.

http://stampingforu.blogspot.ca/2017/02/freeze-frame.html


To go to the next one or start from the beginning, click on the 'next' button.

http://victoriapapershaper.blogspot.ca/2017/02/one-day-in-land-far-far-away-my-blog.html

Here is a list of everyone participating in today's Blog Hop.


Adrienne
Bruni
Erica
Mi Ran
Sabrina - that's me...

I hope you have been inspired by the creations we have shared with you today, and that you are inspired to create your own item to frame.

Happy Creating!


Sunday, January 1, 2017

Make Your Own 2017 Planner With Project Life!


Many of us use our electronic devices to plan our schedules, however if you like to keep a record of your activities and experiences, it's real nice to have an actual planner where you not only schedule your appointments and activities, but can include small photos and stickers to express your feelings of the day. It is a great year long, daily activity, that is quick and easy rather than scrapbooking. And it's more exciting and fun to go through years latter than a written journal alone.

Right now you can purchase some pretty great planner kits that include some fun stuff to use and can purchase additional items to use in the planner. However, it can be a little on the costly side.

Today I am showing you that you can make your own with some Stampin' Up stuff you may have at home already with maybe just a couple of items you may still need to purchase.


I already had a Kraft Project Life binder and an entire Hello Lovely Project Life card set. I just had to order the accompanying accessories kit!


All I had to do was find something to fill it with. I decided that options were to design and print my own pages, download free already designed pages to print, or find some inexpensive pages were I could fill in my own dates. I chose the latter. (Purchased from Steals.com as seen above and below.)


So now I will show you all the photos of the planner. I just want to say that I decided to keep it pretty simple. I didn't cover the binder with DSP and just double matted a 4 x 4 card from the set and added a 3 x 4 on top of it. I then fussy cut a wreath of flowers out of one 4 x 6 card and cut it in half. Then placed half on the top and the other half on the bottom.


Here is a closer look at it.


Next I pulled some coordinating cardstock colours and created 14 dividers using the Envelope Punch Board. Then came stamping the months on the tabs (except for the first one) using the Perpetual Calendar stamp set. You could also use the Project Life "Date It" set, but the text may be a little too large for the months with longer names.

Then I pulled cards from the Hello Lovely cards and figured out what colours to mat them with and which month to add them to on the dividers.

So now you can just scroll down to look at each month's divider.


For some of the months, I did end up stamping a sentiment on the card, as you see below.


This tab is left blank. I can use this for the next year January, or just for a notes section, or any other need.


On the back of each divider, I attached an envelope to put receipts, photos, or other keepsakes.


An lastly, you will want a place to store accessories for your planner. I took some of the items from the Hello Lovely Accessories set to keep with the planner in a zip loc pencil holder. You can get these at the Dollar Store. I used one I already had. Any other stickers you might have on hand or can find at the Dollar Store that would work for your planner, you may add as well.


So that's it for creating your own planner! I had a lot of fun creating it and look forward to using it!

Let me know, in a comment below, if you have an interest in having a class where you can create your own Planner.

Happy creating!