Tuesday, February 17, 2015

Weekly Deals! - Punches and Background DSP Stack!

For those of you that would like to add to your Punches, there are three of them available in this week's Deals!


Built for Free Using: My Stampin Blog

Oh, and the 2014 - 2016 In Colour Background Designer Series Paper 12 x 12 Stack is for sale too! Love these stacks!

I will be posting a masculine birthday card later today, so come back to see it.

Happy Stamping!


How to use the Hostess code (upper right corner of blog):
  • when shopping online, enter your items into your cart (total must be under $200)
  • at check out, look under "Special Offers" (bottom left)
  • enter the Hostess Code in the box and click on apply
NOTE: If your order is $200 or more, do not use this code


Thursday, February 12, 2015

Painted Blooms & Simply Wonderful Easel Card

Hello everyone!

I have a beautiful easel card to share with you today. I just received some new things that I ordered and am excited to share with you what I made. This is a card that requires a little patience working with a bunch of fiddly little blossoms. But, it is so worth the end result for someone special.


Using leafy paper from the new collection "Painted Blooms" as a background, and several "Itty Bitty" punched flowers that I inked and used the "So Saffron" Stampin' Write Marker for a dotted center, I created three different colour Hydrangea flowers. A very dimensional card, which I love to make.

This easel card even has dimension inside!


Of course when placed in an envelope this will flatten a little. Here are other views of the inside.


To make this card -

Card Base
  • cardstock - 1 @ 10" x 7", 1 @ 7" x 5" - Score the 10" x 7" with the 10" across the top of your Simply Scored board and score @ 2" & 5"
  • Fold score lies with your bone folder
Card Front
  • cardstock - 1 @ 6 3/8" x 4 3/8" 
  • background DSP - 1 @ 6 1/4" x 4 1/4"
Card Front Tag
  • cardstock - 1 @ 2" x 3" - punch one end with one of the Tag Topper punches
  • Whisper White - 1 @ 2" x 3" - punch one end with the same Tag Topper punch and trim approx 1/16" off of each side
  • stamp with your choice of sentiment (I used "Simply Wonderful" from the Sale-a-bration catalogue)
  • attach this onto the cardstock piece and then trim off unneeded part at the top
  • attach to the card front with dimensionals
Flowers
  • Using the flower from the "Itty Bitty" punch set, punch out about 3/4 of a sheet of 8 1/2" x 11" Whisper White cardstock
  • Ink edges with your choice of colours
  • Use the "So Saffron" Stampin' Write Marker to dot the flower center (brush tip)
  • use the rounded end of your paper piercer or a large ball flower stylus and press the center of the flower down into your paper piercing pad to shape the flowers
  • With your 2" circle punch punch out 2 Whisper White circles and cut them in half
  • Start layering and attaching the blossoms onto the half circles with glue dots (leave at least 12 flowers for filling in around the half circle)
  • When completely filled attach to desire position on card front with dimensionals
  • fill in around the half circle, with the saved flowers, right onto the background. This makes the dimension of the flower more realistic.
Card Inside
  • cardstock - 1 @ 6 3/8" x 4 3/8" 
  • Whisper White - 1 @ 6 1/4" x 4 1/4"
Sentiment Band
  • cardstock - 1 @ 4 1/8" x 1 3/8"
  • DSP - 1 @ 4" x 1 1/4"
  • cardstock - 1 @ 3 5/16" x 5/16"
  • Whisper White - 1 @ 3 1/4" x 1/2" (stamped with sentiment)
  • pop up with dimensionals in desired position
  • add remaining flowers to embellish
Attach the front of the card onto the 2" folded section on the front of the card

Hope you enjoyed the card and are inspired to create your own. See below for all the materials and supplies used for this card. This would make a great Easter card, or Mother's Day card.

Have fun punching and stamping!


How to use the Hostess code (upper right corner of blog):
  • when shopping online, enter your items into your cart (total must be under $200)
  • at check out, look under "Special Offers" (bottom left)
  • enter the Hostess Code in the box and click on apply
NOTE: If your order is $200 or more, do not use this code

Built for Free Using: My Stampin Blog

Tuesday, February 10, 2015

Weekly Deals and a New Photopolymer Stamp Set

 This week I have my eye on the Digital Stamp Download! Plus, there are some dies to choose from to add to your collection.


Built for Free Using: My Stampin Blog


There is also a new photopolymer stamp set available - "Lovely, Amazing You"

Built for Free Using: My Stampin Blog

Love this stamp set with the little envelope, heart, feather, and sentiments! Have fun shopping!


How to use the Hostess code (upper right corner of blog):
  • when shopping online, enter your items into your cart (total must be under $200)
  • at check out, look under "Special Offers" (bottom left)
  • enter the Hostess Code in the box and click on apply
NOTE: If your order is $200 or more, do not use this code


Wednesday, February 4, 2015

Weekly Deals - Add to Your Punches!

This week's Weekly Deals is a good one for those wanting to add to their punches! It even includes the new Ornamental Tag Topper Punch! And...stock up on your Dazzling Glimmer Paper too!


Built for Free Using: My Stampin Blog

Decided to include a Stampin' Up video for you today about the "Irresistibly Yours" Designer Series Paper.


I'm also sharing with you this "Berry Basket" demo. With Easter not far, this will be a fun die to have!


Thank you for stopping by today to have a look at the great deals and fum demos!


How to use the Hostess code (upper right corner of blog):
  • when shopping online, enter your items into your cart (total must be under $200)
  • at check out, look under "Special Offers" (bottom left)
  • enter the Hostess Code in the box and click on apply
NOTE: If your order is $200 or more, do not use this code


Saturday, January 31, 2015

Easy, Shiny, & Glitzy Valentine

My last Valentine card for one more Grand-daughter. This one is very shiny with silver foil, and glitzy with Silver Glimmer hearts.


This is a little different form the traditional Valentine card, but very much suites the Grand-daughter that will receive this card. She takes after her Mom, one of my daughters.

For this very easy card I used Silver Foil cardstock as the card base, used silver metallic ink to second stamp the flower border, and mounted it onto Strawberry Slush cardstock with  1/4" border. I usually prefer 1/8" or 1/16" borders, but this card called for wider boarders.


You can see in this close up the layering. The Sweetheart heart has two layers of dimensionals, while the glitzy Itty Bitty hearts have only one layer, as does the Strawberry Slush piece on the Silver Foil card base.

Have you ever considered using foil cardstock as a card base? Try it! It's fun and makes a very unique card! You can see the product I used, below.

Thanks for stopping by today!


How to use the Hostess code (upper right corner of blog):
  • when shopping online, enter your items into your cart (total must be under $200)
  • at check out, look under "Special Offers" (bottom left)
  • enter the Hostess Code in the box and click on apply
NOTE: If your order is $200 or more, do not use this code

Built for Free Using: My Stampin Blog


Wednesday, January 28, 2015

Tall & Skinny, Girly & Bright Valentine

Today I'm sharing with you one more Valentine card for another Grand-daughter. I had fun playing with my
ink pads, stamps and sponge.

If you'd like to do something similar or copy this card, here are some helps.

Strawberry Slush - 9 1/4" x 8"
With 8" across top of your score board, score @ 4"

Whisper White - 8 7/8" x 3 5/8"
With a sponge blend together Calypso Coral, Strawberry Slush, and  Crushed Curry, covering the entire piece.

Strawberry Slush - 2" x 8"
Punch each end with your favorite tag Topper Punch

Whisper White - 2" x 7 3/4"
Punch each end with your favorite tag Topper Punch and then trim 1/16" off each side and with your scissors round the corners.

Stamp and mask your choice of stamps, in the same ink colours, all over the strip. Attach to the Strawberry Slush strip and feed ribbon through the slots and tie with string.

Whisper White - Stamp your sentiment or image and punch or die cut out.

In this next photo you see a close up of the sentiment.


And next, you see how the layers of the card were done.


Hope this has given you some inspiration to play with your inks too! What colour combination would you use? You can see what I used, below.

Thanks for stopping by to have a peek. Happy stamping!


How to use the Hostess code (upper right corner of blog):
  • when shopping online, enter your items into your cart (total must be under $200)
  • at check out, look under "Special Offers" (bottom left)
  • enter the Hostess Code in the box and click on apply
NOTE: If your order is $200 or more, do not use this code


Built for Free Using: My Stampin Blog


Tuesday, January 27, 2015

Texture Lovers' Weekly Deals!

This week's Weekly Deal is for those that love embossing paper with Textured Impressions Embossing Folders! It even includes the Texture Boutique Machine at a reduced price!


Wow, these folders would certainly add some fun to our creative tools!

Built for Free Using: My Stampin Blog

Well, I'm trying to decide which ones I would like to add to my folders. Maybe, Decorative Dots, Lucky Stars, and Zig Zag Texture....

Remember to take advantage of free items from the Sale-a-bration catalogue for every $60 you spend from the Occasions and Annual Catalogues til March 31st! After that, those Sale-a-bration items are gone.

Have fun shopping and stamping!


How to use the Hostess code (upper right corner of blog):
  • when shopping online, enter your items into your cart (total must be under $200)
  • at check out, look under "Special Offers" (bottom left)
  • enter the Hostess Code in the box and click on apply
NOTE: If your order is $200 or more, do not use this code


Monday, January 26, 2015

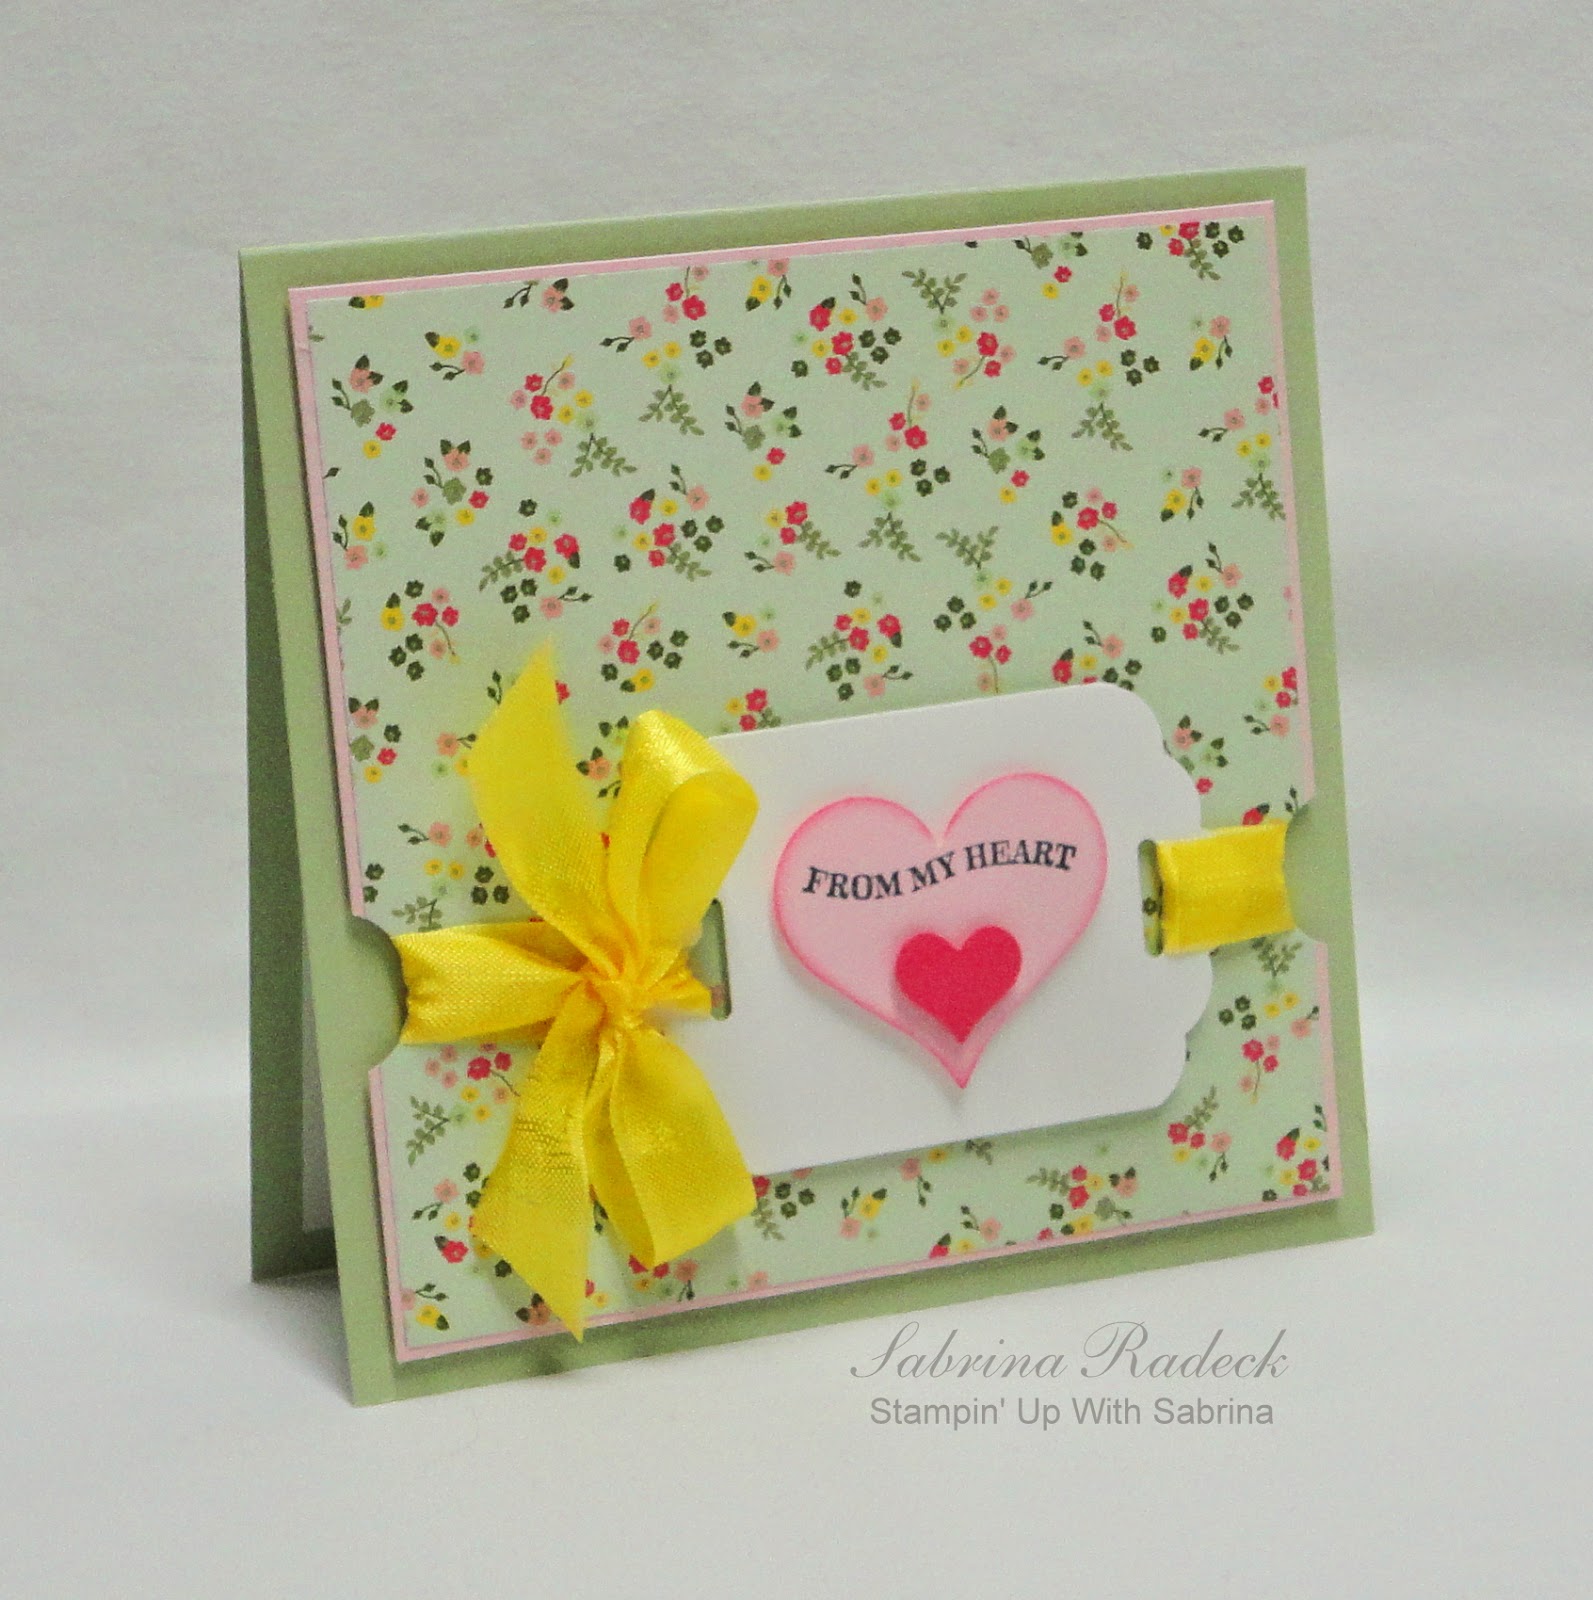
All Abloom Valentine & Freshly Made Sketch Challenge


I can't believe it's been nearly a week since I posted on my Stampin' Up blog! I've had a very interesting week which, unfortunately, kept me quite busy. This morning I realized I had to complete those Valentine cards for the rest of my Grandchildren, so I will post a few more over the next few days.

For this one I decided to use a challenge to create the card with. I chose Freshly Made Sketches with the current challenge #170.


This is a nontraditional Valentine card using the "All Abloom Designer Series Paper Stack" and the sketch from FMS to the left.

The yellow ribbon came out a bit brighter in the photo than it really is in real. This is a very quick card to make, and to add a little something different I decided to punch a half circle where the ribbon would wrap around feeding from the right end of the tag topper , around the back, and up through the left end of the tag topper. You use a bit more ribbon, but it is a different look.


In this next photo you can see a little better the layering of the card.


If you'd like to make this card yourself, following are the measurements, and below are the product used.

Pistachio Pudding - cut 1 @ 5 x 10 & score with 10" at the top @ 5"
Pink Pirouette (Blushing Bride would be better) - cut 1 @ 4 5/8" sq
All Abloom - 1 @ 4 1/2" sq
Whisper White - 1 @ 2" x 3 1/4" and use a Tag Topper Punch at each end
Punch out a "Sweetheart" heart and a "Itty Bitty" heart.
1/2" ribbon @ 24"

Punch a 3/4" circle about 3" up from the bottom on each side of the pink & All Abloom layer.


Built for Free Using: My Stampin Blog

Thank you for stopping by today to have a look at my latest Valentine card. 
Happy Stamping!

Looks like I missed entering by one minute or less. Oh well maybe next time.


How to use the Hostess code (upper right corner of blog):

  • when shopping online, enter your items into your cart (total must be under $200)
  • at check out, look under "Special Offers" (bottom left)
  • enter the Hostess Code in the box and click on apply
NOTE: If your order is $200 or more, do not use this code


Tuesday, January 20, 2015

New Weekly Deals & A Hostess Give-a-way!


It's another Tuesday which means new Stampin' Up Deals for this week! And here are the great deals!


Most of these are going onto my list! Especially those skin tone Blendabilities! Look at that price!!

I also have something special to give to the first person here in the Victoria, BC area to hold a workshop, open house, or class in their home by the end of February. Let me know what you think will work for you! You can have a kit class (this includes Paper Pumpkin too), a just stamping party, or make a couple of cards, and so on.

Have questions? Contact me at sabradcreations@gmail.com (just so that you know, I do not hold such event on Sundays).

Want to know what the Hostess Give-a-way is? Its the Label Card Thinlit valued at $40.95!


The first person to have a function in their home by the end of February, will receive this Hostess Give-a-way from me! Flip cards are so fun and this die set will make the job so easy!

Two great things for this post. Remember to use the Hostess Code in the upper right corner of this blog for your order this week, as long as it is under $200.

Looking forward to a Stampin' Up event in your home!

Happy Stamping!


How to use the Hostess code (upper right corner of blog):
  • when shopping online, enter your items into your cart (total must be under $200)
  • at check out, look under "Special Offers" (bottom left)
  • enter the Hostess Code in the box and click on apply
NOTE: If your order is $200 or more, do not use this code


Monday, January 19, 2015

A Lotus Blossom Valentine

I have 7 Grandchildren with one more due in February. There are 5 grand-daughters and 2 grandsons (February brings the 3rd grandson). I have a couple more Valentine cards to make after this one. Obviously this one is for a girl.


Playing with this three step stamp set, "Lotus Blossom" is so much fun. At the Open House I had on the tenth, this stamp was played with by almost everyone that came! I think that says how much fun it is to use. One blossom is stamped directly onto the card piece, while another is stamped onto a scrap piece and cut out. This one is then popped up with dimensionals.


The two hearts were punched out of the DSP and then sponged with Calypso Coral to give them a finishing touch. They are also popped up with dimensionals as is the white confetti heart strip.

On the inside of the card I added a sponged heart as well.


I was thinking after I made this card that it could be a wedding card too! Just add the names of the bride & groom in the hearts, or some sentiments of some kind.


Hope you've received some inspiration from this card. To view the product used you can scroll down to the end. Thank you for checking out my creation for you today!

Happy Stamping!


How to use the Hostess code (upper right corner of blog):
  • when shopping online, enter your items into your cart (total must be under $200)
  • at check out, look under "Special Offers" (bottom left)
  • enter the Hostess Code in the box and click on apply
NOTE: If your order is $200 or more, do not use this code

Built for Free Using: My Stampin Blog