Showing posts with label Christmas. Show all posts

Saturday, November 17, 2018

More Bethlehem Edgelets - Long Cards

Surprise, surprise!

I am back again posting more cards I made using the Bethlehem Edgelets. You may not know this, as I do not often get the chance, but I love to make long or tall & skinny cards that fit into a #10 business envelope. This size is a little out of the ordinary, giving it a more unique look. That is what I did this time for this card design.


Because I am using Soft Sky, a discontinued colour but all I have at the moment, I was limited in the number of cards I could make with these colours. I am sad to see Soft Sky is no longer available, as it was one of my favourite Stampin' Up cardstock colours.

Let's have a closer look at the card, shall we.


I used a gold gel pen to trace around the outer edge of the Crumb Cake oval, and to draw the little stars over Bethlehem.


Again, I love the Bethlehem layers!


The oval is popped up too.


Well, that is it for now. I have had fun playing with the few Stampin' Up product I have access to at this time. I so look forward to having it all in a craft room again all at my finger tips.

Thank you for stopping by, and I hope you enjoyed seeing the fun I have had. I have to go back to my work in preparing samples for classes to teach at Scrapbook Essentials BC. So, it may be a while before I can post again. We will see. Maybe in early Spring....

In the mean time I say, Happy creating!


Friday, November 16, 2018

Life's Curve Balls & Bethlehem Edgelets

Hello Everyone, and Welcome!

Here I am! Are you surprised? I must apologize to everyone, I truly thought that I would have the time to create some personal Stampin' Up projects while teaching classes at the studio. Turns out that I have been busier than anticipated. I have really missed coming to this blog to post and share. However, I have wanted for quite a while to create Christmas cards using the Bethlehem Edglets, and finally have had the chance to do so.

I was inspired by a card creation I saw on Pinterest (could find the link to who created it) who used this die set, and the Star of Night stamp set. I had to be creative as I do not have the 'Star of Night' stamp set. But I do like mixed media, and happen to have stencils and paste that would take the place of the stamp set and add some texture to the card at the same time.

When deciding on the number of cards to make, I decided that a dozen would be good, as I wanted to make other card designs using this die set for this Christmas. So here they are!


The sentiment stamp you see is not Stampin' Up, as most of my Stampin' Up product is in storage and has been for a little over a year now. Here is what the card looks like.


I do not know if you can tell from the photo, but the smaller die cut star is cut from the 6 x 6 pack of glitter paper. The larger star is just Whisper White.


If you see some glitter on the white stencilled paste, that is because I put it there after the paste dried.


I sure like the layered look of the Bethlehem scene. This is a die set I will keep for a long time.


I am sure many of you that follow this blog, may have had this set for a while, but for me this is the first time I had a chance to use it. I plan on making a few more cards with this die set, so see you soon!

It was wonderful to post here again with some Stampin' Up product!

Happy creating everyone!


Saturday, November 26, 2016

Seashore Stampers Blog Hop - Quick & Easy Christmas Card


Last Saturday of the month means it's time for Seashore Stampers Blog Hop! Welcome from Mi Ran's blog.


Today we are sharing last minute or quick and easy Christmas cards. Sometimes there are are those unexpected additions to your card list, or someone you forgot last year and almost did again. And then there is the busy schedule that has you putting off your cards to the last minute. Or perhaps you want to make all the cards at once, keeping them simple for mass production....

Now, everyone's interpretation of quick & easy can be different. So for that reason I am showing the same card, well supposed to be the same card, done four different ways. They were supposed to be landscape cards, but I forgo that when I made this first one.

This first card is pretty basic. Just stamp, mat, tie a ribbon, and pop up on the card base. Can't get any easier than that. Just remember it's supposed to be landscape.


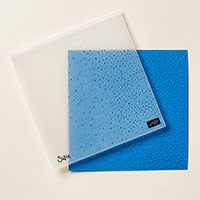
White with a hint of red is quite striking. And, of course will work with any choice of colour for your Christmas card/s.


Measurements:

Card base- Whisper White Thick - 11 (5 1/2")w x 4 1/4"h
Real Red - 4" w x 2 3/4" h
Whisper White (reg) - 3 15/16"w x 2 11/16"h


Next, we take the above card and step it up a bit with some DSP. Using DSP for cards is another way to add a little something to your card/s without all the work. Just a little extra cutting that is easily done while watching your favorite TV show or movie.


Measurements:

Card base - Whisper White Thick - 11 (5 1/2")w x 4 1/4"h
DSP - 5"w x3 3/4"h
Whisper White (reg) - 4"w x 2 3/4"h
DSP - 3 7/8"w x 2 5/8"h

You can see the two parts that are popped up in the photo below.


OK, still keeping it simple but just folding it differently and adding a couple more cuts and stepping up one more notch. A Gate Fold card! These always bring a little brighter smile to the receiver's face because it's just a little more unique.


Measurements:

Card Base - Whisper White Thick - 11 (5 1/2") x 4 1/4" h
SCORE @ 2 3/4" & 8 1/4"
DSP - 2 @ 2 1/2" h x 3 3/4" w (cutting with the pattern matching down the center - could cut 1 @ 5" w x 3 3/4" h and cut down the center)
Whisper White (reg) - 2 @ 2" w x 2 3/4" h
DSP - 2 @ 1 15/16" w x 2 5/8" h (or cut 1 @ 3 7/8" w x 2 5/8" h and cut down center)

In the next photo you can see what is popped up.


If that is still a little too simple for you, you can step it up just a bit more by adding red mats to it. It's still an easy card that just adds time to cutting and matting pieces.


Measurements:

Card Base - Whisper White Thick - 11" (5 1/2")w x 4 1/4" h
Real Red - 5" w x 3 3/4" h
DSP - 4 15/16" w x 3 11/16" h
Whisper White (reg) - 3 15/16" w x 2 11/16" h
Real Red - 3 7/8" w x 2 5/8' h
DSP - 3 13/16" w x 2 9/16" h

And, again, just the two layers are popped up.


So there you have it. Three additional versions to the very clean and simple card below, all of which are quick and easy according to your style and skills. The choice is up to you.


Hope you enjoyed these. Now on to see what Addriene started with today. Or go backwards and go to the previous page the Mi Ran posted!


http://stampingforu.blogspot.ca/2016/11/quickielast-minute-christmas-card.html

http://victoriapapershaper.blogspot.ca/2016/11/seashore-stamper-november-blog-hop.html


Participating today is...


Adrienne
Bruni
Erica
Jean
Mi Ran
Sabrina - that's me...

Thank you for hopping with us today, and I hope you see something that inspires you.

Happy creating!


2 DAYS LEFT TO take advantage of the Extravaganza! And remember, Monday the 28th is the last 24 hour Flash Sale, so be sure to check in to see what is on sale Monday!


4 DAYS LEFT TO GET THIS DIE SET BEFORE IT COMES OUT AGAIN IN THE 2017 - 2018 ANNUAL CATALOGUE!
http://www.stampinup.net/esuite/home/sabradcreations/promotions

From November 1st through 30th, you have the opportunity to purchase Stitched Shapes Framelits ahead of their official release in the 2017-2018 annual catalog and get 25% off coordinating stamp sets. With Stitched Shapes Framelits you can make paper stitches in seconds, turning any project into one that is stitched from the heart.


Friday, November 11, 2016

Per Requests - Christmas Sampler Help


I have had several requests for the instructions on how I created my Christmas Sampler a while back. At first I was hesitant to share too much as I plan on having a few more classes with different themes based on this project. Then I decided that sharing this would just mean I need to create a different layout for each new sampler! That would be better any way and a challenge for me. Problem solved.


So here we go. To make yours exactly like mine you will need the following: (you can of course substitute what you wish to)
  • 12 x 12 cardstock for background
  • 3 sheets each of 8 1/2 x 11 cardstock in two different colours
  • coordinating Stampin' Write Markers (colouring stamps)
  • Foil cardstock (your choice of colour)
  • Tin of Cards stamp set (142180)
  • Peace This Christmas stamp set (141570)
  • Wonderful Year stamp set (142158)
  • Seasonal Bells Bundle (143533) stamp set (142107) Bell punch (141846)
  • Layering Square Framelits (141708)
  • Pretty Pine Thinlits (141851)
  • Coordinating Ink Pad colours to your cardstock choices
  • pencil
  • ruler
  • Fast Fuse, Tear & Tape, or glue
  • Dimensionals

Coloured Die Cut Scalloped Squares

  • Die cut 12 scalloped squares @ 2 1/2"
  • Die cut 12 scalloped squares @2 1/4"
Straight Edge Die Cut Squares

  •  Die cut 12 straight edged squares @ 1 7/8'

Center Squares (paper trimmer)

  • 1 @ 4 3/4" square
  • 1 @ 4 1/2" square 
  • 1 @ 4 1/4" square

Decorative Die Cuts (Pretty Pines)

Die cut your choice of embellishing die cuts in foil and coloured cardstock

Bell

Stamp your bell onto a coloured cardstock and punch it out with the Bell Punch

STAMPING

Decide before you begin if you wish to ink the edges of your squares. You can do this before stamping or after stamping

Use your Stampin' Write markers for the stamps with multiple colours and the coordinating Ink Pads for regular stamping of other stamps.

ASSEMBLY

  • Use your pencil & ruler to light draw a line 3/4" from the edge of your 12" x 12" cardstock background.
  • With the larger scalloped squares position them around the edge, nearly touching the pencil line, and eyeballing the spacing (or measure if you wish)
  • When satisfied, attach them onto the background
  • Now center the largest of the center mats
  • go around and attach the next layer of squares with dimensionals (or adhesive if you wish it to be flatter)
  • attach all your stamped squares with dimensionals
  • attach all your embellishments
Here are the photos again, of the three sample I made


Have fun making your version of my Christmas Sampler!

Happy Stamping!


http://www.stampinup.net/esuite/home/sabradcreations/promotions

From November 1st through 30th, you have the opportunity to purchase Stitched Shapes Framelits ahead of their official release in the 2017-2018 annual catalog and get 25% off coordinating stamp sets. With Stitched Shapes Framelits you can make paper stitches in seconds, turning any project into one that is stitched from the heart.


Wednesday, November 9, 2016

Christmas Sampler Class Photos


A while back I had a couple of classes were we created a Christmas Sampler with a choice of colours. For one of the classes I remembered to take some photos, and today I am finally sharing them with you.

Each person had my original in front of them and was able to use it as a guide while they stamped and positioned everything.


And of course, I forgot to take more photos during the class, but did remember to get two of my friends with their completed projects.


Adrienne and Erica, your projects look wonderful. It was fun having you in class.

I'll be back later today with a card posting for you.

Happy stamping everyone!


http://www.stampinup.net/esuite/home/sabradcreations/promotions

From November 1st through 30th, you have the opportunity to purchase Stitched Shapes Framelits ahead of their official release in the 2017-2018 annual catalog and get 25% off coordinating stamp sets. With Stitched Shapes Framelits you can make paper stitches in seconds, turning any project into one that is stitched from the heart.


Thursday, November 3, 2016

Wonderful Year with Lovely as a Tree and Layering Circles Dies


By now you know that I love all white, or mostly white cards. I've cased myself from this card (last card on this post), as a request to add to a Christmas card class this year. I just had to add that sweet white pom pom trim to it.


A close up of the image created using "Lovely as a Tree". If you don't have this set, get it before the end of May 2017, because it has been in the catalogue so very long, that one never knows when it will be retired.


Side view shows the layering and thickness at the sentiment are, but it will go into an envelope easily enough.


Inside, I couldn't decide on a sentiment and left it for later. But, I did create a bit of an image with the "Lovely as a Tree" set.


So there you have the final card for this class. Hope to see you in class on the 21st! A great class for those last minute cards.... Do you want one more Christmas card class at the beginning of December? Let me know.

I am very excited right now, because I will be at a Canada wide Stampin' Up! event which we will be leaving for bright and early tomorrow morning to catch the ferry to Vancouver. I've heard that these events are incredible and fun, so I am looking forward to the experience. This will be my first big Stampin' Up! event. One great thing about this event is that we will be able to see the new Ocassions and Sale-a-Bration catalogues before they come out, and some of the product as well. We even get prizes from the new catalogues! How great is that! Looking forward to sharing them with you when I get back.

While away, I have some posts scheduled for you, so enjoy.

Happy stamping and creating!


DON'T FORGET THE NOVEMBER SPECIAL OFFERS AT THE END OF THIS POST


http://www.stampinup.net/esuite/home/sabradcreations/promotions

From November 1st through 30th, you have the opportunity to purchase Stitched Shapes Framelits ahead of their official release in the 2017-2018 annual catalog and get 25% off coordinating stamp sets. With Stitched Shapes Framelits you can make paper stitches in seconds, turning any project into one that is stitched from the heart.