Saturday, April 30, 2016

Birthday Blossoms - So Saffron & Smoky Slate


I have always loved the colour combination of a light soft yellow with a light gray. As a matter of fact, in the mid 1980's I renovated our kitchen with these colours. I painted all the cabinets this gray, with a very soft yellow trim on the inner edge of the raised panel of the cabinet surfaces. The lower half of the walls in a ligther gray with the chair rail, baseboards and window frames in the same gray as the cabinets, and the upper part of the walls were wallpapered with a very soft yellow that had a sprinkling of small 3/4" - 1" flowers in two shades of light gray with some light rose here and there. The yellow was softer than So Saffron, but to this day it is a Kitchen that I still think fondly of. That is not, however, what inspired this card's colours. I just wanted to work with So Saffron and to compliment it chose Smoky Slate. It wasn't until I saw the colours together that I remembered that kitchen.

Any way, let's get to the card. As you can see I did a little background stamping using the small flower bunch stamping with So Saffron on like cardstock.


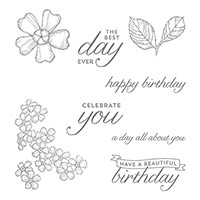
The shaped Banner is created using the Deco Labels die set. The sentiment, one of five with this stamp set, is stamped twice. Once on the banner, and once on a scrap of Smoky Slate where the banner is cut from and popped up over the sentiment stamped on the banner. The leaves were stamped with Smoky Slate onto like cardstock and cut out with scissors. Love that I didn't have to cut out the flowers, but could use the Pansy Punch. I only wish there was less cardstock showing around the edge. I could fussy cut them out, but most people I think would like to use the punch, so I did that.


From the side view, below, you can see that the banner and the flowers are popped up with dimensionals.


Again, I kept the inside simple.


Well that's four cards made using the "Birthday Blossoms" stamp set (and Pansy Punch for some). I think I have one or maybe two more to showcase before I choose which four to have for class in June.

Thank you for stopping by to have a peek today. Happy stamping!


Friday, April 29, 2016

Your Online Orders & My Thank Yous

HEADS UP:  I would just LOVE to send a thank you to you when you place an online order... but the
contact default is set at  "no contact" and often left at that setting, thinking you are just opting out of spam. The truth is that little checkbox means I cannot see your name and address.
The No Contact button means I cannot provide customer service, or even express my gratitude to you for your order. I can't stress enough how bad that makes me feel! To know that you think I'm ungrateful or ignoring you just KILLS me.
So, two things... Number one, if you really don't want a Thank You or any customer service, please let me know! If you want me to send you a Thank You, get you a new catalog, and answer any questions you might have, follow the instructions in the snip below. If you've ever ordered online and wondered why it wasn't even acknowledged by me, your demonstrator, --please take a moment to go into your online Stampin' Up account and change that setting. I will be SO happy to know who to thank and to be able to assist you will GREAT customer service.


Thank  you so much for making that change on your Stampin' Up Account. I look forward to being able to thank you for your Online orders and help you with any questions you may have.

Happy Online Shopping!


Birthday Blossoms - Soft Neutrals


Working with soft neutrals, and just a hint of soft colour, is another way to make a striking card.


With this card I stamped and coloured with Shara Sand and Aqua Painters. Before it completely dried I added with an Aqua Painter just a hint of colour here and there on the leaves (Pear Pizzazz) and on the blossoms (Soft Sky) with a hint of yellow in the flower centers (So Saffron).

Die cutting a frame from the image and popping it up gives it a very elegant look.


So you can see below, that the only popped up is the frame.


For the inside I decided to use the blossom bunch rather than the leaves and larger blossom. and then sponge the Sahara Sand and Soft Sky for some colour.


Well, this makes three cards created with the Birthday Blossoms stamp set. I have more ideas, so there will be others to still show you.

Have fun stamping!


Thursday, April 28, 2016

Birthday Blossoms - Purple & Gold


Deep rich colours with gold or silver foil are always are striking. Some soft neutrals and pastels work well too. For this card I chose to pair gold foil with Elegant Eggplant. I chose a very simply CAS design for this card to emphasize the colours.


I love to use the metallic embossing powders that coordinate with the foil. It looks so regal. The blossom is gold embossed onto Very Vanilla and filled with colour using an Aqua Painter, then punched out with the Pansy Punch.


The sentiment is also heat embossed in gold.

The photo below shows the layering.


With the gold foil mat, I did not want to take away from it, so I just simply stamped the leaves in the corners.


Thank you for joining me today in another showcasing of the Birthday Blossoms stamps set.

Happy stamping everyone!