Saturday, December 5, 2015

Trying Something New For Scrapbooking - Part 4

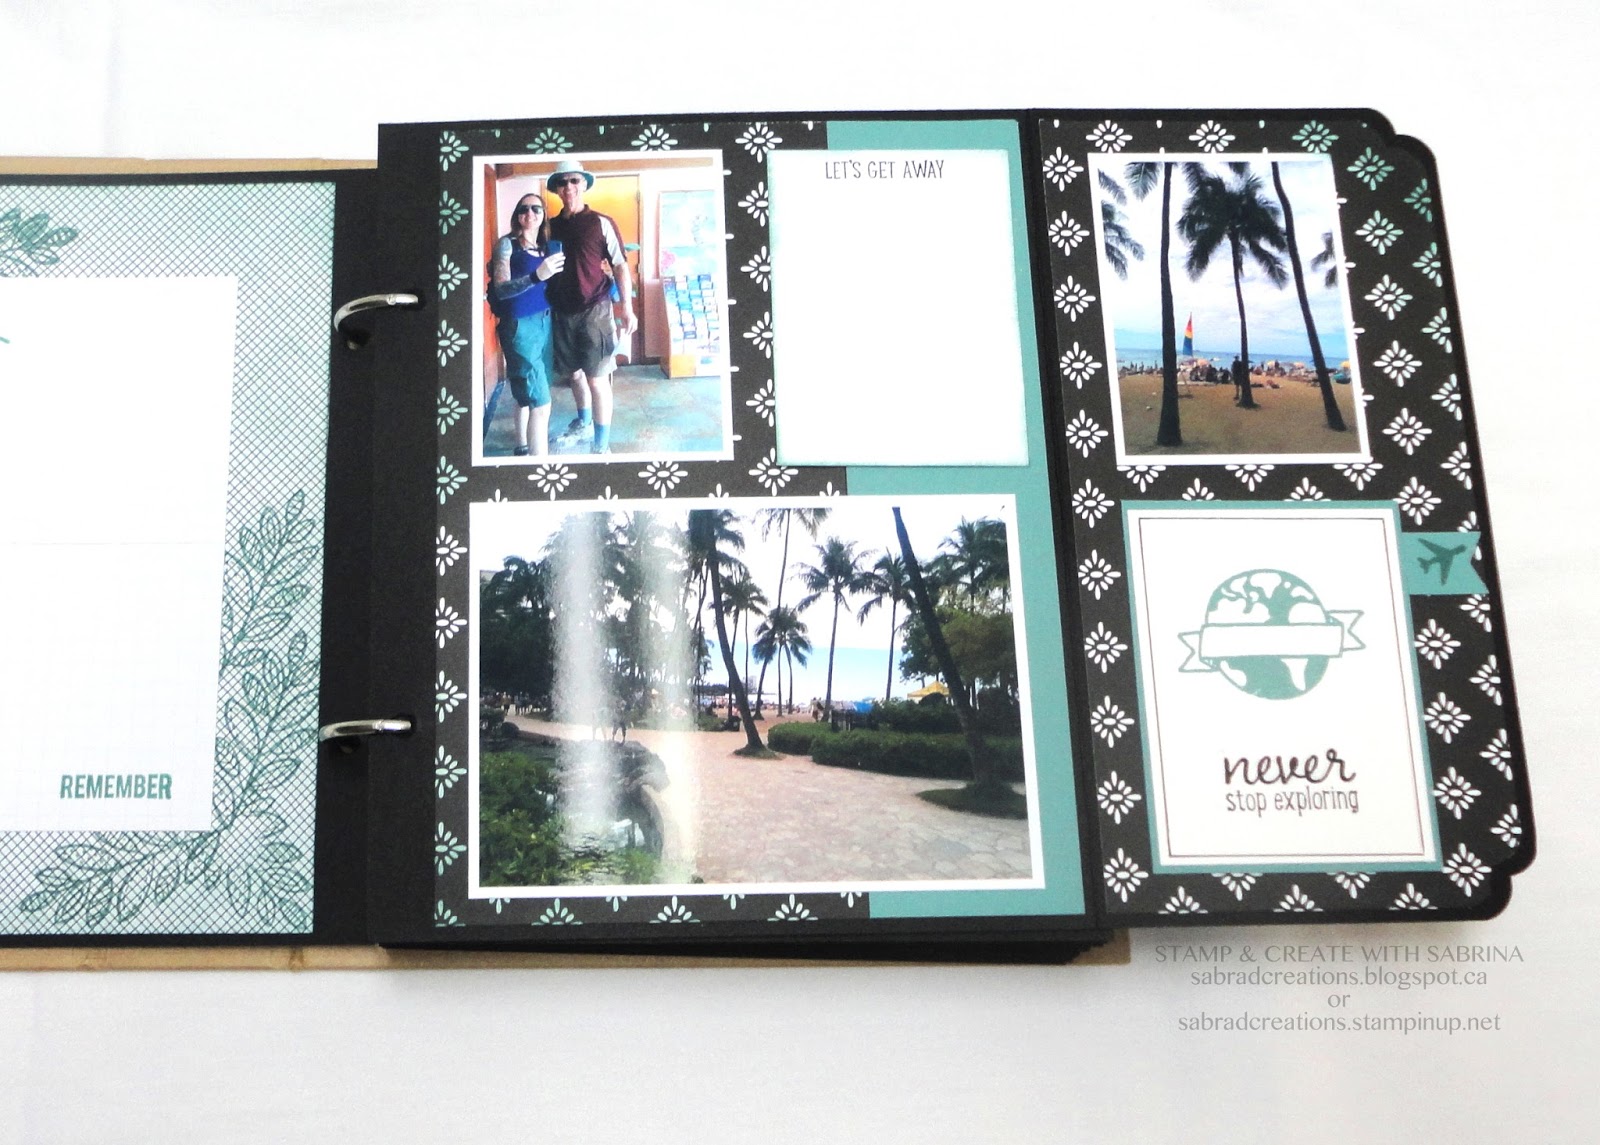
OK, this is part 4 of the series, but today I'm showing you an 8 x 8 album that I made for my eldest son's family in Phoenix. In Part One of this series I explained how I got these retired Stampin' Up! 2013 Christmas 8 x 8 albums. I wish Stampin' Up! made this size regularly, but as you saw in Part one through three, you can still make larger pages for the current albums.                                

So this is how I made most of the pages for this sized album.

Each page consists of using an entire 8 1/2 x 11 sheet of cardstock .

  1.  Punched three holes to line up with the rings along one of the 8 1/2" sides.
  2. If you want the flap on the right (front), flip to the back side with holes on right, 11" across top, and score at 8 3/4". If you want the flap on the left (or back) place with holes on the left, 11" across top, and score at 2 1/4". 
  3. I didn't use much DSP (Designer Series Paper) on these pages and opted instead to do more stamping. With this size of page you would go through a Lot of DSP. But when you do use it, keep in mind your paper pattern.
  4. Using scraps of cardstock and DSP works very well. Even narrow strip work great and can be stamped on with little sentiments.


On many of the narrow flaps I added additional parts to it for more photos, etc., as you see in the next two photos below.


As in my previous album, I also added photo flaps on the page itself as you see in the next photo. I used the Envelope Punch Board to create the tab.


The next two photos show a much larger addition to the side flap.


I love adding stamps onto the photos. It adds a little something...


A few different ideas on this next page layout, and I used some DSP here. See the little booklet on the left...


...it opens up to reveal a couple of photos. After all these years I still love the look of the faux stitching.


I also created a pocket using DSP, placed a photo on it, and three more photos on the tag inside. Two smaller photos on the front of the tag, and a large on the back, that I did not take a photo of.


I used DSP leftover strips on this tag.


It seems that I forgot to take a picture of the page on the left below as it opens up to the left revealing a 16" spread. Don't know why I forgot to do that? Oh well.


I love the Black & White photo of the page on the right. Working with black and white photos makes creating pages of an album so much easier since you can use the same colours throughout the entire album without worries of matching up colours that go well with colour photos. That might be something to consider...doing an entire album using just black & white photos.

Tomorrow I will continue with the rest of this album. See you then! You can see what I used for this entire album below, excluding colour of cardstock and inks. I did use some retired stamp sets as well which do not appear below.

Happy Stamping!


Built for Free Using: My Stampin Blog


Find out which 2015 Holiday Catalogue items will soon be gone! You have until January 4th to purchase RETIRING products while supplies last!

Here is the link to the Holiday Retiring List.


Friday, December 4, 2015

Trying Something New For Scrapbooking - Part 3

This will be the third and final posting for this particular album. See part one, and part two. I had a lot of fun creating this album and look forward to modifying my idea further in future ones. Tomorrow I will be showing you the other album I created as a Christmas gift left behind in Phoenix.


In this next photo you will see that I placed photos on top of a larger one, making it kind of look like photo inserts. My daughter had taken photos of smaller things such as birds and flowers, and since you don't want photo after photo about these things, by printing a wallet sized photo I was able to punch these and position them on a much larger photo where there is just background. Remember you don't have to scrapbook every single photo of your trip. Only those that tell the story. By doing this you add some interest.


By creating a flap like this one, you can add more photos. I love using wallet sized photos! Less cost and takes up less space.


I love this photo of my youngest daughter saying her farewells to Hawaii. And, it makes a great last page.


Be sure to play around with the sizes of your photos, and cut them in sections if need be. It looks great spread out that way, as you've seen in some of the ones I've done in part one of this series.


Hope you enjoyed viewing this album and some of my ideas. See you tomorrow for the 8 x 8 album.

Happy Stamping!


Built for Free Using: My Stampin Blog


Find out which 2015 Holiday Catalogue items will soon be gone! You have until January 4th to purchase RETIRING products while supplies last!

Here is the link to the Holiday Retiring List.


Thursday, December 3, 2015

Trying Something New For Scrapbooking - Part 2

Yesterday I shared with you how I got to creating this kind of an album as well as the page dimensions, etc. Today, I'm sharing with you a few more pages. You will recall that with this black & white "Everyday Chic" DSP ( 138445) I use sponges to add colour.

Remember, you will have excuse some of the photos as some are not clear. I had to take the photos very quickly, just hours before leaving, and didn't realize that the settings had somehow changed on my camera. And since I'm uploading and posting the photos after having given the albums away, I can't retake the photos for you. So let's continue with the tour of the pages shall we.


The "Luau" letters are leftovers from a past "Perpetual Calendar" kit


You can see here that the flap doesn't match the two page spread, that because I should have had it fold to the other side as it is part of that layout. This happens throughout the album. A lesson learned.


If you can't get all the photos you want on your layout, add 'flip ups'. I used the Envelope Punch board to create the tabs. You can write on those tabs....


There are still more pages to this album, but I will show them to you tomorrow. So, come back and check them out. Hope you are being inspired to create something like this for your Christmas gifts and Christmas Albums.

What I've Learned

One thing that I would so differently on my next album, is to either blacken some hole punch strengtheners (you know those self-adhesive white rings to attach to each hole), or I would attach a 5/8" strengthening strip at the edge that has the holes punched into it, to double it and strengthen it. The cardstock begins to wear and eventually will rip through to the hole.

The other thing is to create the pages as you go rather than all ahead, as nice as that is, because you don't know which direction you want those flaps to go until you create your layouts.

Thank you for stopping by and see you tomorrow! Happy Stamping!


Built for Free Using: My Stampin Blog


Find out which 2015 Holiday Catalogue items will soon be gone! You have until January 4th to purchase RETIRING products while supplies last!

Here is the link to the Holiday Retiring List.

Wednesday, December 2, 2015

Trying Something New For Scrapbooking

Hello everyone! I'm back from visiting family in Phoenix and had an absolutely  wonderful time.

Today, and over the next few days, I will be focusing on scrapbooking. I created a couple of scrapbooks for my eldest son's family and for my youngest daughter. These are Christmas gifts that I brought with me and they opened on US Thanksgiving day. I wanted to see their reactions rather than have them wait for Christmas when I wouldn't be there.

I have been searching for the last year or so for a better way to scrapbook. The 12 x 12 format I am finding too large for my liking these days. Besides I was getting too elaborate with these pages and they were so thick that I couldn't get many pages into the 12 x 12 albums. The scrapbooks end up so heavy as well. I went to pocket scrapbooking (Project Life) and while I like that, it just wasn't me. So I looked into 8 x 8 scrapbooking.


When I first signed up with Stampin' Up! just over a year ago, I was able to purchase two retired 2013 Christmas albums. One I created using the pocket scrapbooking sleeves and of which was unable to get photos of before leaving. I had to combine the pocket pages from two into one, plus purchase additional sleeves elsewhere, which left one album without page sleeves.

I also Purchased two Stampin' Up! Project Life Kraft Albums (139655), which I love! I also love Mini-Albums, but the one disadvantage is the time it takes to create the album cover, and you can't add pages to it.

I finally came up with an idea that might work better for me. So over the next few days I will be showing you what I have done, and perhaps this is something you would like as well. 


Let's begin with the pages I created for the Stampin' Up! Project Life Kraft Albums (139655).

Each page consists of using an entire 8 1/2 x 11 sheet of cardstock trimmed down slightly.
  1. Trim cardstock down to 8 1/4" x 11.
  2.  I then punched two holes (at 2" & 6 1/4").
  3. If you want the flap on the right (front), flip to the back side with holes on right, 11" across top, and score at 4 1/4". If you want the flap on the left (or back) place with holes on the left, 11" across top, and score at 6 3/4". 
  4. Take your choice of 12 x 12 DSP (designer series paper) and cut off 6" keeping in mind your paper pattern.
  5. Cut that same piece with 12'' across, at 8". This gives you two pieces. (one at 4 x 8, and one at 4 x 4)
  6. With the remainder piece (8 x 12) cut with 12" across at 6". This gives you two pieces at 6" x 8".
This is what your pages will look like.


Now let me show you what I did with my youngest daughter's photos from her trip to Hawaii with her dad January 2015. As there are several pages, I will be showing them to you over the next few days. Let's begin with the first few.


For the title page I chose a beautiful photo my daughter took of one of the beaches. This one happens to have been used in the movie "100 First Dates". I like to have an 1/8" white border around my photos which adds a pop to them whether I mat them or not.

I used a "Window Sheet" cut down to 6 3/4" x 8 1/4" and the "Layered Letters Alphabet" (138692) and Project Life "Day to Day" (135785), for the year numbers, with White StazOn Ink (106960).


I decided to use my Stampin' Up! Stamping Sponges (101610) to add colour to each of the page edges. 


On the left I create a space where my daughter could write a basic itinerary of the day to day activities while there. That writing space is created with two Project Life "Grid Cards" (136528) and a few different Project life stamp sets.

As this is the first page, with the a flap, I didn't put photos on it but rather decorated it with a number of stamps on a "Note Tag Punch" and a narrow strip.

Let's open that flap, shall we...


It was great fun using all those stamp sets in the scrapbooking style! I highly recommend the use of your stamps! Here are some of the rest of the pages. (Remember, I will be showing you more another day.) You will have excuse some of the photos as some are not clear. I had to take the photos very quickly, just hours before leaving, and didn't realize that the settings had somehow changed on my camera. And since I'm uploading and posting after having given the albums away, I can't retake the photos.


Well, I hope you enjoyed the album so far and are looking forward to more pages to be shared with you.

Thank you for stopping by to have a look, and Happy Stamping! See you soon with More!


Here is what I used throughout the entire album (except for the colours of ink pads and coloured cardstock used. You will be choosing your own colours.


Built for Free Using: My Stampin Blog


Find out which 2015 Holiday Catalogue items will soon be gone! You have until January 4th to purchase RETIRING products while supplies last!

Here is the link to the Holiday Retiring List.


Tuesday, December 1, 2015

Weekly Deals!


The lovely "Gold Glimmer Paper" is on sale this week! And if you are thinking ahead, Valentines is just 2 1/2 months away, so the "Happy Heart" embossing folder would be a good thing to get at this time when it's on sale!

If you don't have all of the new "In-Colour" stamp pads yet, the "Mint Macaron" pad is on sale! Go ahead and order the refill (138331) for an extra $4.00 along with it so that you can re-ink your pad as soon as needed without waiting to order it.

The "Go Wild" DSP Stack is perfect for neutral card backgrounds, masculine cards, or for making your own pocket scrapbooking cards!

Built for Free Using: My Stampin Blog


For all those that take classes from me, I'm planning for the first three months of 2016, so if you have any requests, now is the time to email them to me.

Happy Stamping!


Ordering Unavailable during Transition- Online Ordering will be unavailable on December 3, 2015, from midnight to 2:00 AM (MT) while Stampin' Up! transitions the system.